Showing posts with label Gifts. Show all posts

Wednesday, November 28, 2007

Faux mini canvas

We are so very excited to welcome the fabulously talented Lousette Ashton back to It's a creative world. I shall hand you over to Lousette and let her weave her magic.

A long time ago I bought several packs of small, very cheap IKEA photo frames, you know the ones that are 3 for £1 or something silly like that. I had grandiose ideas for them, but nothing ever came of it and they sat in a box under my bed for years (literally).

Then one day I saw a beautiful photo printed onto a canvas in a restaurant, and decided to have a go at making my own mini photo canvas using cotton printable fabric from Crafty Computer papers. These little faux canvasses are cute as gifts, and also great for photos that are maybe not good enough for normal printing as the texture of the cotton disguises grain or other flaws.

You will need: Small wooden picture frame Plain white cardstock Spray mount or Photo mount Printable cotton sheet Double sided tape Tacky, PVA or other wet glue Scissors and craft knife

Step 1
Remove the glass form the photo frame. If you have a very dark coloured frame you might want to give it a quick coat with white acrylic paint.

Step 2 Measure the outside dimensions of the frame. Crop a photo to these exact dimensions and print out onto cotton paper. I find it sometimes help to adhere the cotton to a sheet of ordinary printer paper using removable adhesive. Although the cotton has a backing sheet attached to it, it is still quite thin and my printer couldn’t feed the sheet properly on its own.

Step 3 Use double sided tape to cover the front of the frame with plain white cardstock. Trim the cardstock to size. (I always use a bigger piece of card and then trim afterwards using my craft knife instead of cutting the cardstock to size first).

Step 4 & 5 Spray the cardstock with photo mount, remove the backing sheet from the cotton and drape over the frame. The photo mount gives you the chance to reposition the image until it is perfectly placed. Press down gently to make sure the cotton adheres to the cardstock.

Step 6 Cover the sides of the frame with double sided tape and fold the cotton over. Make sure it is nice and taut. Fold each side over onto the back of the frame, mark with a pencil and trim off the excess cotton.

Step 7 & 8 Use double sided tape to finally glue the remaining cotton onto the back of the frame, making sure the corners are tucked neatly on the sides. Glue the excess fabric of the corners down onto the back with tacky glue. Hold for a few seconds until the fabric stays in place.

Decorate the front with embellishments or rub-ons if you wish, or simply leave as is.

Thank you so much Lousette and what a fantastic gift for the children to give relatives at Christmas.

If, like us, you've been inspired by Lousette please let us know. We love to see all your creations. And just a reminder: We will be off line on Friday the 30th November for our move over to typepad!! Please be sure to pop back on Saturday the 1st December for the link to our new home.

Wednesday, November 21, 2007

Advent gift box

Hi, it's Maria here with an idea for an alternative advent calender. We used to have the cardboard calenders but they often get forgotten about or they fall apart before Christmas.
And, if they contain choccie it's a fight to get there before our dog Lucy. She's not allowed choccie, obviously, but she's a bit of a sneaky pup.
Anyhoo, I now put together an advent gift box for the girlie wirlies. I love choosing a selection of little goodies and wrapping them up prettily. The look on the girlie wirlies' faces is a picture when they get their box of goodies.
You will need
* A festive gift box - I use a Christmas biscuit tin for each girlie
* Tissue paper for wrapping
* Ribbon
* 24 small gifts/sweeties
I have shown a small selection of the goodies that will be going in our tins and I will pad it out with other bits and bobs. Sweeties like Love hearts are a special treat in our house so I'll wrap a pack of them. Some small bars of choccie will go in all nicely wrapped. I'll split a packet of gel pens and wrap them up individually. Anything from Claire's is a winner so a little shoppie shop there is required.

You really don't have to spend a fortune on goodies and could just fill the tin with a sweetie for each day.

I tend to keep our box as a lucky dipper but you could number the pressies. You don't even have to put 24 goodies in and could make it last for as many days as you wanted. You really can make it however you fancy and according to your budget.

I quite fancy doing one for the run up to a special birthday. You could give a gift and a clue about the real pressie that is in the tin for the big day. Mind you, if I received it I'd be very tempted to have a sneeky peek.

I hope that you like my advent box and I'd love to know about any Christmas traditions in your home. You never know the advent gift box could become a new tradition for your family.

Ooh, before I go I must say *WOW* love those glitter mists Angela. I think I shall have to partake of some of those.

Ooh, ooh, don't forget that we are still collecting for breast cancer awareness and will have a few more giveaways for those that donate.

Toodle pip

Monday, November 19, 2007

From start to finish

Mid month Monday and the final crochet blanket update!!
For our new readers, the full story is here.
But why don't I recap anyway :)
In the summer I decided to crochet blankets for my nieces for Christmas.
They started out as beautiful coloured balls of wool, all sitting in a big basket.
My first lesson....a 3x3 square 'blanket', that's mine on the right!
It was fun working out all the different colour combinations and how many of each I would need.
224 squares per blanket!!
Putting them together for me was the tough bit but it was also exciting to see how the finished product would look!
224 squares being laid out on a piece of calico.
224 squares pinned to a piece of calico.
448 squares make two very pretty blankets!!
Washed and wrapped ready to go under the tree :)
Oh and of course I am a sucker for punishment so blanket number 3 is underway!!!!
lol, it's addictive!!
This one is slightly different, each square is made up of 6 rows not 4. And i'm also substituting the pink for red :)
For me, this was a HUGE achievement because I am a great starter of projects but not a great finisher.
My DH didn't think I would pull it off, but has since told me how proud he is of me. That kinda makes it even more special!!
If you've not tried crochet yet, it's a must.
Oh and before I forget, I must show off this beautiful blanket made by such a lovely lady whose blog I love to read!!
It's so easy and really, if I can do this anyone can :)
haPPy monDAy!!
haPPy creATing!!
Caz
xx
PS To sign up for the A-Z Project pop us an email acreativeworld@hotmail.co.uk

Sunday, November 18, 2007

Christmas Gift tags

Good day to you all!!
Today we are going to be looking at homemade gift tags.
As crafters we enjoy making gifts and taking extra time in creating unusual wrapping. So, to top off a gift, you need a hand made tag.
And these can be as simple as a stamped, coloured in image like the ones below......
Or something a little more like these gorgeous tags made by Andrea!
And Di has made some 'shabby' tags to use with her rag bags.
I started with some heavy cardboard, paint, glitter glue ribbon and brads. I cut the cardboard into 'tag size' bits, painted and sanded them. Then added some glitter glue and attached some ribbon with a brad.
I then made tiny 'bags' for the tags from calico and ribbon. Popped the tags in and Voila.
The tags looks so cute on matching 'rag' gift bags again made from calico and ribbon.

Thanks for visiting and have a great Sunday!! Caz xx

Don't forget to sign up to the A-Z Project which kicks off on the 5th January! That's just 7 weeks away. For full details see here

Oh and be sure to leave us a comment if you want to stand in line to win a Pocket and Floss kit. The draw will take place at 9.00pm tonight!

Saturday, November 17, 2007

Somebunny Loves Me...

The winner of the Buttonberry kit was Sarah. We've left you a comment on your blog and if you email us we'll pass your address to the girls at Buttonberry.
If you are looking for an extra special gift that you can really put a lot of love into this Christmas - or anytime of year - we think we have found the perfect idea, read on to find details of this weekends super prize draw!!
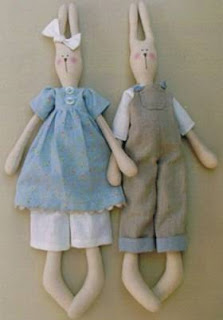
Buttonberry are an online store owned by Emma and Lisa, selling fabric and patchwork goods and stock a vast array of patterns including the rather adorable Pocket and Floss bunnies by Australian designers Melly & Me.
Andrea discovered Buttonberry earlier in the year and has bought several of their lovely patterns including the Pocket and Floss pattern. As she says "After making 17 of these lovely bunnies over the past couple of months I still haven't got bored of creating them and although each one is made from the same simple pattern, they all have their own little characteristics and personality. They make gorgeous hanging decorations in a room and are the perfect gift to celebrate the arrival of a new baby, a birthday or just to show your love for someone."
Andrea's latest bunnies were a gift to celebrate the arrival of baby Luca and a special Christmas gift for a little girl up in Scotland, with the addition of a little embroidered pinny to keep her frock clean during all the Christmas preparations!

The Pocket and Floss pattern is very easy to follow with simple step by step instructions and Buttonberry carry a vast array of fabrics for making your own bunny, why not visit their online store and check out their latest fabric finds, we love their Christmas fabric ranges and we can't imagine anything nicer than giving a special Christmas gift created with love that will last forever.

The girls at Buttonberry have very kindly donated a Pocket and Floss kit to make your very own bunny as a prize for all comments left on our blog during this weekend (we will draw the winner at 9:00pm on Sunday evening). Please leave some way of contacting you with your comment (blog link, email address or forum username etc.) so that we can track you down and send you your wonderful prize.

If you feel inspired to make your own Pocket and Floss bunnies please leave us a link when you finish them so we can all come and take a peep!

Have fun crafting this weekend and don't forget to leave us a comment to be entered into the prize draw.

Love from the IACW and Buttonberry girls

xxxxxxxxxx

Wednesday, November 14, 2007

an easy gift

A very good day to you all :)
Today we are going to make a gift.
It's quick, inexpensive and pretty!!
PERFECT!!
Firstly you need to choose a few different bits of fabric (off cuts work well!).
Then you need to decide what shape you are going to use. I have chosen birds! Which I down loaded from a cool site called Kiddley!
I cut 2 birds from 3 different co-ordinating fabrics (ie 12 sides, 6 birds) using my pinking shears.
Next I pinned them together with wadding in the middle for stuffing. Oh and added a bit of lavender in each bird too :) This is particularly good if giving this to someone who likes nice smelly things! (like me!!)
I used button thread, which is nice and strong, to stitch them up, making sure I added the ribbon as I went. The top piece of ribbon is looped. For the eyes I used gold beads which I chose to stitch on afterwards and pulled them tight to give the bird a little bit of shape. In all it took about 3 hours to make, including the time on the internet looking for the bird shape. Of course this is a great project to do with the kids! You can cut the shapes out of foam or felt and decorate before stringing them together with twill, ribbon or wool!! haPPy creATing Caz xx

Saturday, November 03, 2007

New Home Gift

Good morning to you!!
Today we have another great idea that is quick and easy but fun to make :)
I made these new address cards for my brother and his girlfriend who finally moved out of our spare room and into their own home.
They took about 25 minutes to make and are printed onto white 6 x 4 postcards that I bought in our local office supplies shop for about £1.00 a pack.
I created a new file in photoshop and used the doodled house from the font 2Peas GGs Love Me (downloaded from 2peas) to create a border of sweet little houses. I increased the size of the middle house to make it stand out and added colour with the paint bucket tool. I saved the image as a j-peg. Create a new document that is 6" x 4" in your word processing programme and import the house image to create a border along the bottom of your document. Add the text and print out. I doodled a red border with felt tip around the edges.
Stack the cards onto white envelopes, tie up with red gingham ribbon and a white wooden heart and you have a sweet and very individual present that looks like it took hours to make but in reality took less than half and hour
Andrea
xx
And if you thought the giving was over you are mistaken!!
The lovely Kate Hadfield has made these In the Pink Journalers especially for you!!!

Friday, November 02, 2007

Matching Home Decor Accessories

Well, I don’t know about you, but I find it hard to buy accessories for my home in the right colour scheme, with matching items for a reasonable price, today I have made a couple of small items using 2 sheets of patterned paper, 1 sheet of cardstock, ribbons, lace and small embellishments that we all have lying around in our stash.

First, the box, it is an MDF given to me by a friend, I sanded it all to give a key, and then painted it with a deep red acrylic paint, it needed two coats to cover it nicely. I cut and inked patterned paper to cover the top and all four sides and used permanent spray adhesive to stick it to the box. I then used lace and ribbon, a button and a couple of metal embellishments and fiddled until I was happy with the result. I used a gold marker to go round all the edges of the box to give it a bit of a lift. The candles were taken from a class in a cyber crop a couple of years ago by Debbie I used the same patterned paper and card to match to wrap the candles, and used brads to secure the paper and card at the back. I used the same ribbon and lace to tie round the centre to finish them off. These all sit in my living room and do get commented on by friends and family. I hope you have enjoyed today’s post and will get some inspiration from it. Trish xxx

And we almost forgot the winner from our last October lucky dipper is Sharon Peters. Please send your address to us at acreativeworld@hotmail.co.uk and we will get your prize to you!

And sorry about confusion yesterday I did not realise that we had THREE Janes who contributed layouts so the winner of Andrea's beautiful pink collection for the scrap your boobs layout is JANE with her LO titled "Big, Small, Men an' all"!!!!

Saturday, October 20, 2007

Delightful terracotta candle pots

Hey there everyone! A big HI to you all today from Caz!
Today I am bringing you a very quick easy project that has no limits :) but in the spirit of Chistmas.
I found these beautiful church candles at John Lewis for £2 each! Yes that's right £2, and that was for the big ones, the smaller size were only £1 each (Wish I had bought more!). But my problem was I didn't have candle holders for them! That was until I stumbled across these cheap but very cute terracotta pots at my local garden centre and I just knew they would work! All I did was give the pots and wipe down to get rid of any water marks and cob webs (!) and tied some raffia around the rim to give them a country look.
The pots cost 39p and 59p for the larger ones!!!!
It was that easy and they look so pretty!
Now obviously we like to be able to adapt our projects to use for lots of different occasions, so some other ideas:
How about painting the pots orange and having them out in the garden for halloween.
How about using them as a centre piece when you have a fancy dinner party, a bit of black velvet ribbon around the rim would really snazzy them up!
Or you could paint them loads of different bright colours and have them on your outside table when you have a bbq.
And finally give them as a gift, if you buy the teeny weeny pots you could give 3 with a bag of tea lights to someone who enjoys having candles around the house. The teeny pots cost about 29p each!
I hope todays post has inspired you to add a little light into your life.
Caz xxx

And Hi from Di the MDD (Mad Dear Mother) of Caz. I have a little challenge for you today!!!

For every 1 pound that you donate to IACW Just Giving page I will donate 1 pound. This challenge is open until Sunday midnight 21st October!!! So come on girls just 1 pound from each of you! And why would I do this? Because cancer took my mum. Here she is....

Because of her I have a mother,I am a daughter, and I am blessed.

Love from Di

Tuesday, October 02, 2007

Tipsy raisins for Christmas...

Hi from Di.
TodayI bring you an easy peasy idea for Christmas. These are DELICIOUS! (and I do not touch brandy normally.) You can make them for home or for gifts and believe me with ICE CREAM they are delish!!!
Lets start with what you will need:
750 gm seedless raisins
1 litre of inexpensive brandy
2 jars ( I used empty coffee jars)
some fabric and ribbon for decoration

Day 1 Put the raisins in your jars and top up with brandy as shown Day 2: The raisins will have begun to "sup" up the brandy so mix up the raisins with a spoon and top up to cover with the brandy.

Day 3: The raisins are still "supping" up the brandy so again, mix up the raisins with a spoon and top up to cover the raisins with the brandy.
This is how much brandy you should have left. Now just leave then in a nice cool place to FERMENT LOL.
OK you cannot leave them too long they will last FOREVER.
But eventually decorate and give them away (boo hoo) or use them youself!!! I dipped two circles of cream fabric into a bowl of hot coffee, rinsed the fabric, let it dry then made a lid and tied with ribbon.
I decided to make just two gifts but you could easily decant the raisins into smaller jars and have about 4 or 6 gifts!!!
Eat them out the jar, pour them on ice cream, or serve with Xmas pudding. They will warm the cockles of your heart.
PS. Don't forget to to visit our Just Giving page where you can make make a donation to Breakthrough Breast Cancer.
Woo Hoo as of this morning you have donated 100 Pounds!!! Great stuff Folks and THANK YOU!!!
Love from Di and thanks for visiting!!!