Saturday, July 14, 2007

Beaded Bookmark

Hiya all, hope you are all still enjoying the goodies we are bringing you every day. Today I am doing a beaded bookmark; it would be a lovely end of year gift for a teacher if your children have not broken up yet, or if not a Christmas pressie for them, (sorry to bring Christmas up in July). If you enjoy reading this looks so pretty hanging over the edge of your book. For the bookmark you will need: - Metal bookmark with a small hole on the hook. Headpins and/or eye pins Jump rings Selection of beads. Round nose pliers Wire cutters If you are struggling to get a bookmark you can buy a kit from http://www.funkykits.co.uk/ While you are there have a look at Tracy’s other jewellery kits they are all free P&P. Thread your selection of beads onto the head/eye pins and make a 90-degree bend in the pin, cut the end to about 1cm. Use your round nose pliers to bend the pin into a loop meeting the other end at the top of the bead. If you are using an eye pin you can dangle a charm or more beads from the eye end.Thread the jump ring into the hole in the bookmark end, then hang your pin of beads from this and close the jump ring, (when opening and closing jump rings use 2 pairs of pliers to twist it open left to right rather than just pulling the ends apart as this weaken the ring). and that’s it, as easy as that, have fun with this and don’t forget to leave links to your creations when you leave a comment. Bye for now Trish xxx

Friday, July 13, 2007

Not just an ordinary pin cushion!

How about a little buddy to sit on your desk and keep your pins safe?
These sweet little pin cushion are a doddle to make and you DON'T have to be good at sewing!! They started out life as a pattern for a strawberry!!!!!!!! on the Martha Stewart website and I adapted them into mice.
Use the pattern for the main part of the strawberry to cut your body and sew up the edges to make a 'cone'. Use a small running stitch to gather the end of the cone. Stuff with toy filling and cover with a circle of felt about the size of a 2pence coin. Use small stitches to secure this and then add a tail from wool or paper string like mine and then cut two small ear pieces and stitch to the top of the face. Use embroidery thread for his features and don't forget to give him whiskers!! They look lovely on their own but they look even better as a little mouse family.

Thursday, July 12, 2007

Afraid to doodle?

Me too! I look at all these wonderful layouts and cards in magazines and online galleries with delicate and intricate doodles and I just think no way!! However, one night when I was blog hopping I came across A House of Colour and it sent me off in a complete change of direction, made me realise that I can doodle and that I've been doodling most of my life - especially in those boring meetings and lectures I have to attend (my meeting notes are always so much more colourful than my neighbours!!) Doodling doesn't have to be flowers, swirls and scrolls. It can be dots, lines and zig zags - in fact anything goes!
Why do I always find inspiration in the middle of the night? It was about 1:00am when I found Adriennes blog and of course I couldn't go to bed I had to get out my pens and card and create!!
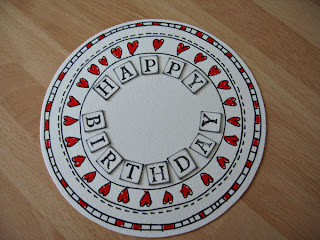
Step-By-Step Doodled card
1) Doodle your design on card using a fine tipped permanent pen, I used a CD, glass and my roll of double sided tape to draw the circles in pencil first, then rubbed the pencil lines out after tracing over the top. By using a permanent pen you eliminate the chance of the ink smudging and the felt tips running into the black. When you have finished drawing your design cut it out leaving a border of a couple of millimeters.
2) Add colour using felt tips, paint or coloured pencils

3) Use alphabet rubber stamps to stamp the sentiment. I used PSX pixie stamps and a black stazon inkpad.

4) Cut out each letter and ink around the edges with black chalk ink.

5) Position your letters onto your card and when you are happy with their final placement use glue (I used glossy accents as I seem to use it for everything!) to attach them to the card.

6) Punch a flower shape out of patterned paper.
7) Doodle around the edges of each petal using a fine tipped black marker.

8) Gently curl the edges of each petal between your thumb and finger and use chalk ink to define the edges.

9) Cut your patterned papers to fit your cardstock and attach using your sewing machine in a combination of straight and zig zag stitches.

10) Use foam pads to stick your doodled design onto your card, add the flower and then a
button or doodled centre to the flower.
11) Finish your card by running a black chalk ink pad around the edges of your card.
I hope you find inspiration to pick up your pen and start doodling. Perhaps like me you'll relise that you've always been doodling - just in your own style. There's no stopping me now!!
Love from Andrea xx

Wednesday, July 11, 2007

DIY decorating - Make it personal!!!

Hello from Joy xxxxxx
I am on a mission… to make my house look personal – full of things that mean something to me. Some of it is hand-made… some of it is reserved for artwork that I hope to buy someday… One part of this project is in my computer room/spare room. The walls were just blank, and I knew I wanted something family oriented in there – something different that I could be free to play with… So I decided to make a film-strip-type borderdisplaying layouts across all of the walls of my room. From a distance:
Slightly closer: I got these 12 inch plastic record frames from Au Naturale: http://www.aunaturale.co.uk/aunatsite.php You have lots of options, though. You can get lovely wooden frames from various scrapping outlets, or you can get clip frames on line. Look for 30cm or 12in square ones like these: http://www.picturelizard.co.uk/product_info.php?cPath=27_120&products_id=11927&ref=2 Or these record frames are gorgeous, too, for a fancier touch: http://www.indeliblepink.co.uk/IPDetail.asp?ProductID=34 Enjoy :0)

Tuesday, July 10, 2007

Bling it up baby

Hi, it's Maria here again with some ideas to brighten up your life and save you some pennies.
We're in the process of hauling our house out of the 1970s and into the 21st Century. I'm not sure about you but I find the actual cost of decorating a room fairly bearable. But, when you come to buy those pretty accessories the pennies sure do add up.
The price of lamps was something of an eye opener so I settled on some from good old Marks and Spencer at the bargainous price of two for £9.50.
They are nice lamps and they do the job but I really fancied something with a twist. Now, I'm a pretty simple gal and settled on an old brooch pinned to the shade for my bedside cabinet.
However, my girlie wirlies go for the more is, well, more approach. They ummed and ahhed over the brooch idea and then I spied the most fabulous shiny diamante flower braid. According to Charlotte it is the same as the bracelet for her *Bling bling Barbie*.
Ladies, we had a winner. If it's good enough for the pneumatic plastic bombshell that is Barbie it's good enough for us.
The braid is made up of small flowers with a diamante centre and is easily trimmed to size. I simply measured the length and attached with a dab of super glue on alternate flower centres. This is much easier if you can enlist a helper to pop a peg on the braid as you go round. Leave the pegs in place until the glue dries.

Remove the pegs and voila one blingeroonie bedside lamp.

I do hope that you like this *nifty but thrifty* idea and would love to see any altering that you ladies get up to.
Toodle pip
Ooh, don't forget that you can click on the piccies if you want a closer look.

Monday, July 09, 2007

Today we are going to blow the budget!!!

Hi there, from me Di, wishing you juicy “Watermelon Afternoons” . And its been another week of great inspiration from IACW design team. What a fabulous post yesterday! Today we are going to blow the budget and use loads of stash so get prepared to "Use Your Stash".

I am currently selling my home and as my friend Jann has been a frequent visitor to my home over the past 20 years, I decided to include the theme of my home into a birthday card for her. So just a little view of my home...

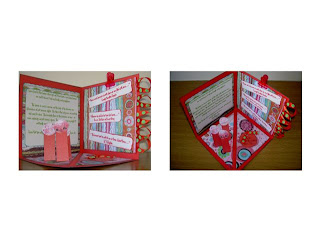
When I saw the "3 Bugs in a Rug Blossom Laughter" patterned paper, I just could not believe it. It said to me, “buy me, buy me, buy me”. So I did. A newbie card maker, I have loved folding paper since I discovered origami as a child. Here are a few views of the card I made for Jann…

On the back of the card, I have include a little pic of my "laughter" lounge, to remind Jann of lots of happy afternoons. The card folds up because of the scored base and is tied together with ribbon.

Oh! Oh! Oh! By the way, remember that I am the “Crafter on a budget”, normally persuading you to “Use your Stash”, so yes, I recycled some chipboard letters using an “I” and a “3” to make the “B” of “Birthday”.

To make the card, I used Bazzil red cardstock, 3 Bugs in a rug Blossom Laughter, loads of ribbon, buttons, and a few chipboard letters.

And then I blew more stash and made a large envelope for the card. Again I used Bazzill pickle, Bazzill Bling Pink and 3 Bugs in a Rug Blossom Tulips, some ribbon, a button, and some tiny magnets hidden beneath the PP to keep the envelope closed. OK, here are the normal “scribbled instructions” from my original design. (If you click on the image it will enlarge!!!)

You of course could use this technique for ANY card so on the same theme of folding the paper – here’s a different shape made as a "Welcome to your New Home" to the 'Buyers' of my home. To make the card, I used Bazzill Bling pink, Basic Grey Phoebe collection and loads of ribbon. But.... if you want to use your scraps, you could use 6" by 6" squares of leftover patterned paper and scraps of assorted ribbon.

Ok now you can have a laugh at me!!! Just in case you thought that's all for today, we are going to blow even more stash!!! I do not like to give away the things I make, so decided to really use my stash and create a layout of Jann's birthday card.... It took me all of 15 minutes.

OK I've included my home in a "birthday card", a "Welcome to your new home" card what you think I have made for me? I have made something very special for me, but you have to wait a while to see that lol.

Thanks for reading and love from Di XXX

Sunday, July 08, 2007

Kids Creating Art

I'm sure that all of us deal with Children in one way or another. Whether you are a parent, carer, teacher or someones relative we all are involved in some way. What better way to create a keepsake than by getting the kids involved in the Art itself. Some of the us ladies on IACW have been getting crafty with our children and here are some ideas you might want to have a go at! Enjoy!!! Cath xx Andrea I am a teacher in A Special Needs School and also the Art Co-ordinator so the children in my class do a lot of art! A couple of weeks ago I set them a challenge to make an art gallery to brighten up a corner of the classroom. They really took the challenge to heart and produced some fantastic pictures on the theme of 'landscapes'. I thought I would share this on It's A Creative World as I know a lot of you will be at home with your children over the long summer holidays and will need to fill in the odd rainy afternoon.
These pictures were all made with just coloured tissue paper and pva glue. I was so amazed at how well they came out, especially when you take into consideration that these children all have very severe special needs and are only 7 and 8 years old. Just tear the tissue into strips, glue onto the background using pva and then cover the whole thing in another layer of pva to seal it and to give it a shiny finish.

This method could be adapted to create colourful art for your home by taking on a theme of spaceships, seaside, sunshine, under the sea etc. and your children could make an original work of art for their bedroom.

Love from Andrea x
Cath
I decided to get my son Corey involved in making a canvas for my kitchen. Not only did i make a work of art but also a unique keepsake. Keepsakes are very precious to me. Corey was a very sick little boy when he was born 12 wks early and spent 5 months in hospital. During those times, not being a scrapbooker then, i didn't value the concept of keeping everything so to have memories for the future. I truly understand how important it is now.
I picked up a canvas at Home Bargains for £1.99 and used the paint i already had so that is literally all this cost me! This really couldn't be any simpler. I basically painted Coreys hands with a variety of colours and the pressed his hand down on the canvas to make the pattern.
You can obviously just let the child go for it but i wanted something that was somewhat neat. But if you aren't bothered about that then just let them rub their hands in paint and go for it. The result, i think, is a stunning work of art and one that will have pride of place on my wall! Thanks! Cath xx
Joy 2 fabulous projects from Joy!
Shells
Materials: Shells, bag/bucket, water, Adirondack inks, plastic tubs, paper towels/newspaper/messy mat, spatula, bowl
This is a simple project you can do yourself or with kids of any age. My 2 year old son helped me, and he's still talking about it :0)
Collect your shells from the beach... Look for bright colours - anything that grabs your interest. (I even gather little rocks - heart shaped ones - for other projects.) Wash them thoroughly, and leave them out to dry.
Then fill small plastic tubs with water and add a few spritzes of Adirodack colour wash of your choice in each tub. You just want enough water to cover the shells you place in each tub. Leave them overnight to soak.
Have a messy mat (or old plastic table cloth - something you don't mind getting paint on) and paper towels ready. Line the messy mat with paper towels. Gently remove the shells using a spatula or spoon. Pour the excess water down the sink (but leave the water running a bit to rinse any dye from the tub). The shells should be ready for use in a few hours.
Then pick a lovely bowl for display. :0)
PAINTING with your kids with Berol Water Soluble Wax sticks opens up a WHOLE NEW WORLD of creativity... I had the adult version for messy play, and I went looking for some for Calum that would survive little hands. These fabby little things are coated in plastic for easy grip, and the break down easily when dipped in water to make opaque paint - so easy, so much fun, and something just a little bit different to try with kids....
Trish
I used 2 6x6 canvases
Anitas acrylic paint
Anitas metalic acrylic paint
Black felt tip pen
The hands of 2 small children
The handprints, outlines and writing on each canvas were done by my 6 year old and 4 year old kids.
It says ***** right hand, aged *
They had great fun doing this and getting covered in paint, a lovely gift for a family member.