Saturday, June 09, 2007

What can you do with a block of wood?

Gosh, it’s my turn again and I really can’t believe that we are already a week old. We really do hope that you are enjoying It’s a creative world as much as we are.
Anyhoo, today I am going to share one of my décor ideas. I used Jenni Bowlin’s vintage red line so I could get away with using it as a Father’s Day pressie as well. I also have details of a fantastic prize draw and an amazing special offer for you all. First, to the project.
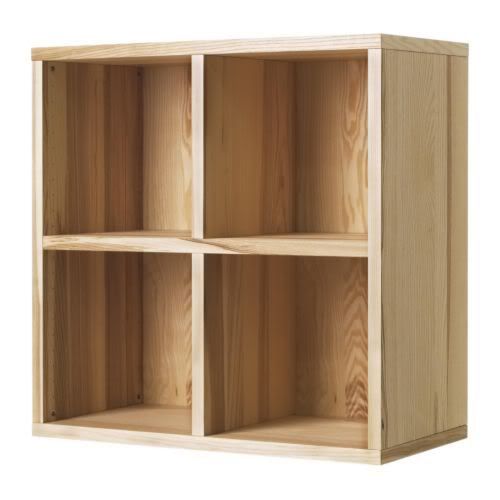
I love having lots of pictures and memories around the house. But, I don’t always want to use photo frames and like to use things that are a bit different. I’ve seen wooden cubes you can buy to decorate but decided to use an offcut of wood to make mine. A bit of economy here and there pleases Graham and means more pennies for pretties. We had some wood left over from a DIY project but you could easily pick some up at your local timber merchants. This is also a handy project for using up those bits of stash that we all have kicking around the house.
I lightly sanded the cube and then used double sided tape to stick my papers and photos on. I then sanded the edges of the paper with a nail file and whizzed some brown ink over to muddy them up a bit.
The bird and the papers are from Jenni Bowlin, the buttons are Melissa Frances and the rub on is Basic Grey. I’m so happy that the Jenni Bowlin stuff is now available over here and I can fill my basket at A Trip Down Memory Lane.
Now onto the big news of the day and we have yet another prize draw for you. Yes, all of the lovely people who leave comments over the weekend will go into a draw to win a kit from Scrapbook Central. Please check back on Monday to claim your prize. It can be difficult to track you down if you don’t have a blog to link to so please do check back. We’d hate for you to miss out on your prize.
Not only do we have the fabulous kit as a prize but the lovely people at Scrapbook Central have also provided all our readers with a code to enjoy a whopping 15% off their lovely stock. Simply enter the code GEYJE50 at the checkout it is valid for one week and can be used once per person. Now that is a fab excuse to go shopping. Go on ………… You know you want to.
Thank you so much for visiting us and I hope that you enjoyed my project and would love to see any cubes that you make. My cube is 4"x4" but you can make them any size that you want.
Pip pip

Friday, June 08, 2007

Something for the weekend!

Today is the 1 week anniversary of It's a Creative World, and what an exciting week it has been! Thank you all so very much for your support, encouragement and enthusiasm, without which we wouldn't be doing this. Now to help us celebrate we have two exciting offers to share with you all this weekend! Neither of them are to be missed so be sure to check back tomorrow when Maria will tell you all about it! Ooh i'm such a tease :) This week we have also had two wonderful ladies join our creative family. Trish, who inspired us all with her fab altered shopping bag on Wednesday. Trish makes the most wonderful jewellery using beautiful beads in gorgeous colours, and I certainly hope she has a few jewellery making classes lined up cause this lady has true talent that needs to be shared. If you are looking for a little crafting excitement this year Trish is one to watch! And Jo, who's amazing style of scrapping is admired and loved! Jo's gallery is a treat of deliciousness, with two gorgeous girls, who I may add she takes the most gorgeous photos of! Her funky, zesty layouts will give you a zing this summer that will have you dancing on the ceiling! Don't let her out of your sight :) When I first thought of starting this blog I not only wanted our wonderful design team to inspire you but also to give you ideas for upcoming events. And what better time to start, than right now when there is just over a week until Fathers Day. The file folder I have used for this project is from Daisy D's and is a diecut so all you have to do is push the folder and file pages out and start putting it together. I printed my photographs 2 on a page using my Epson picturemate (they measure 3.5" x 2.5") and I found that to be a good size for the pages, leaving enough room for stamping, embellishments and journalling. I have used photos of my husband and his children that I took on a recent walk around the field to see the cows, thankfully I had brought the camera as the conditions where perfect to capture them all relaxed and not posing. 
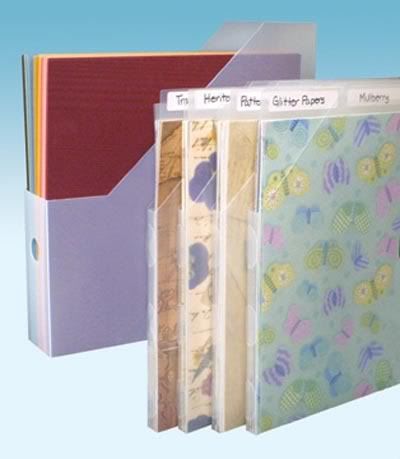
This is a great project to use up some embellishments you have been hoarding, those scraps of paper too precious to throw out, oh and a bit of that ribbon you have stashed away! On the tabs I have used stamped words, buttons, the dymo, and a making memories hinge.

Hint: When binding the album use a broad ribbon together with a thin ribbon. You are going to tie bows with the large ribbon and use the thinner one to secure the knot and ensure it doesn't get too tight or else your book will not open. Firstly, using both ribbons together, tie a knot making sure the book can still openthen using just the thin ribbon tie another knot over the 'combined ribbon' knot. This will keep the ribbon in place. Then tie a bow over both knots with the thick ribbon and trim the ends. For my folder I used thick green with thin pink ribbon.

File folders are also great way to showcase photos of holidays and trips that you don't want to fill a whole album with, but of course you need to scrap the occasion. But watch out they can be addictive!

Happy Friday everyone!

Caz

xx

Thursday, June 07, 2007

Quick Cards...

It should take less than 20 minutes to make this card and by changing the sentiment it could be used for a whole range of occasions.
1) Start with a card blank, apply double sided tape around the edges. 2) Remove the backing from the tape and carefully line up the corners of your card blank to the corners of the patterned paper and smooth in place. 3) Use a craft knife to carefully trim around the card, use the edges of the card blank as a guide. 4) Fix a large bloom in the centre of the card using double sided tape. 5) Punch a flower from patterned paper, ink and slightly curl the edges and fix a jewelled
brad in the centre. Use a foam dot to raise the small flower slightly.

6) Stamp a sentiment onto card stock ensuring there is a space between each letter, then trim around each individual letter and ink the edges.

7) Arrange the letters on your card and only when you are happy with their placement attach with glue.

You could also make this card as a birthday card, get well soon, thank you or a party invitation.
I'm really looking forward to seeing the cards that you make so please leave a link in the comments box.

Wednesday, June 06, 2007

Canvas Shopping Bag

Recently I have started to use my own bags when I go shopping instead of the shops own plastic carrier bags. In this age of recycling and trying to reduce plastic waste its something we all need to think about. You can buy bags from most supermarkets and chain stores now for this purpose, but what about altering or improving a plain canvas one, I got mine from http://www.bakerross.co.uk/ they come in packs of six and are the perfect size to pop in your handbag so you have it with at all times. Enjoy, love Trish xxx First I inked mine with Tim Holtz distress inks, daubing them onto a craft mat, spraying with a little water and wiping and dabbing the bag onto it, heat set the inks and kept re applying the ink until I was happy with the result. I put in outside to dry off completely, when it was dry I rinsed it out so the inks were more faded. While the bag was drying I used Adirondack archival and distress ink to colour a piece of linen fabric, again I allowed this to dry then rinsed it out. I wanted to use the phrase ‘I love shopping’ in a few different languages and with the help of a friend and http://translation.langenberg.com/ I found nine other languages to use, I copied and pasted them into a word document and changed the fonts and font sizes until I was happy then printed them out onto the linen fabric, cut out each phrase and sewed them onto my bag, using a few flowers for extra decoration. You could also use fabric dye to colour your bag completely, use the tie dye method for a retro look or leave it the base colour and decorate it with silk flowers, buttons, ribbons or anything else you have lying around in your stash, let your imagination run riot. I look forward to seeing the pictures of your funky new shopping bags, please leave a link in the comments section.

Tuesday, June 05, 2007

Who lives in a house like this?

Hi, I’m Maria and it’s an absolute pleasure to be part of the It's a creative world team. Today I’m going to give you that much desired extra space and elusive peace and quiet. I only wish that I could magic a few extra hours into your day but I‘m working on that one.
My thrifty but nifty project is a biggie and I hope that you enjoy it.
So, how many times a day do you wish that you or your children had a space of their own? You may have drooled over the fabulous summerhouses that are currently available. If, like me, you almost fall over at the price of them this could be the project for you.
Get yourself a plain old shed and alter it. Now, if you’re following my way of thinking that frees up a fair few pounds to treat yourself to something pretty. We bought our shed online and as you can see it looks like pretty boring.
But, a couple of coats of exterior wood paint and the transformation begins. Graham cut the door in two and created a stable door. We added the window basket and I made the *curtains* by cutting down one of those beaded door hangings.
This is our daughters' playhouse so we added a small garden. A few pots and painting some old fencing finished the whole thing off.
Now here’s the best bit. The playhouse is watertight and ours will have electricity in it soon. Are you getting my drift?
How about leaving the children to play in the garden and creating your very own space. It could be your studio or a place to relax at the end of a long day with a glass of something chilled.
I do hope that you enjoyed this sneaky peek into my world and I hope that you will let me know what you think of this project.
Thank you for visiting please call back soon.
Toodle pip
Ooh, I would just check that your construction is watertight. I know that ours is and I'd hate for you to assume the same and end up with soggy stash.
Thought I'd pop back to answer the question about making it watertight. We didn't do anything special just made sure that it was put together properly. We used the roof felt that was supplied and I do think that painting helps to seal any little gaps. Our shed went up last summer and it is as dry as a bone inside and the girlie wirlies play in it all year round. I hope that this answers your question.

Monday, June 04, 2007

Organisation

Are you desperate to be the next Martha Stewart or Anthea Turner?
I know I certainly am and I try very hard to keep everything tidy, but no sooner have I cleaned and tidied away it looks like a bomb site again! Ring a bell?
Hopefully we’ll be able to provide you with some useful tips to get your organisational skills back on track.As many of you are crafters i’ll start with tips for keeping your craft room/office neat and tidy.
  • Take cues from the countertops: Pasta- and cookie-storage jars and spice and cutlery receptacles adapt perfectly to office work. Glass food-storage jars prevent rubber bands and other odds and ends from taking over the desktop, while a letter sorter keeps postage, tape, and outgoing mail organised.
  • Don’t leave scraps of paper with messages on all over the place; they’re bound to get lost! A bulletin board is a really useful addition. Affix papers and notes with magnetic clips or pins and I find it useful to write a list of birthdays for each month and pin it up so I never forget. You can also keep swatches and pages ideas on there.
  • Bookshelves, bookshelves, bookshelves!!You cannot have enough of them. File and CD boxes holding records, papers, and computer discs can be stacked (along with reference books) within reach on bookshelves, rather than cluttering the desktop. A shelf that's deep and high enough is a good place to set up the printer as well.
  • If you’re always losing your pens then put them in a pot directly next to your keyboard or better still why not invest in a Keyboard Organiser.
  • Clear up clutter: Clear plastic containers are the crafter's best friend. Ribbons could be organised in a small, stackable bin atop another filled with coloured markers, rulers and tape. Storage towers can be labelled on the drawer fronts so you can find just what you're looking for.
  • Try to place your desk near to a window so you get the best lighting.
  • If you don’t mind the permanency then a great ideas for storing scissors and magnetic stuff is to glue magnets to the wall.
  • Use a small tote and keep this on the desk top with the things you use the most often in it. Get in the habit of always replacing these valuable tools BACK where they came from. This will save valuable time and reduce your stress level.
  • Use letter trays. Label each one, i.e. to do, bills, to post etc… and make sure you sort it out at the end of every day.
  • A good idea for storing lots of reels of ribbon is a towel rail that you would have in a bathroom.
And finally and in my opinion THE most important thing!
  • Spend 10 to 15 minutes at the end of EVERY day cleaning up. Set a stopwatch if you have to. Leaving your workroom clean and organized for the next day will make your more motivated to start. The following day you will feel you are starting fresh.
Thank you for reading! Cath xx

Sunday, June 03, 2007

Paper storage

Hi everyone! Cath here , I hope you’re all well?! Firstly a massive thanks to everyone who has visited us , I hope you’re enjoying us so far! Today is the first of many features on scrapbook storage. Today’s topic is on paper storage. After scouring the internet here is just a very small selection of ideas to wet your appetite! First is are these fab little boxes from Liz-Craft. Ideal for keeping your coloured card stock together or maybe keeping different manufacturers together. If you're looking for something a bit bigger then why not go for these fabulous storage cubes from Storage 4 Crafts? These fab cubes hold the Artbin super satchels which hold a huge amount of paper. The other great thing about these is that they come in a variety of colours. Also from Storage 4 Crafts is this stunning mobile storage unit. Holds up to 2,000 sheets of 12x12 paper using 10 Paper Holders. Rolls away for easy storage. The Cropper Hopper folders hold a huge amount of paper each and these are what i use myself. If you use the value pack you also get smaller folders that fit inside so you can divide your paper up inside them. You can use these on the above trolley too. These too are available from Storage 4 Crafts. How about these very attractive storage trays from A Trip Down Memory Lane? Ideal if you want to save a bit of space as they are stackable. They come in a set of 10 and hold a HUGE amount of paper. The Traby shelf unit from Ikea is perfect for 12x12 storage and looks really attractive. Also from Ikea is the Bonde system which again is cubed and you can use these boxes to go inside for easy access. Well i hope that's given you a little information on some of the things that are available out there. Of course there are hundreds of products suitable, some not even scrapbooking related so if you find that perfect product then don't forget to let us know!
And one last thing!!
Huge congratulations to..........
Jo said... How Fab! Wonderful blog - will definately
be back on a daily basis!
Good luck!
Jo
for winning a voucher to spend at A Trip Down Memory Lane! Email us at acreativeworld@hotmail.co.uk with your address and we'll pass it onto Mel and Jill!!