Hi it's Di (on a budget) again from a sunny but cold Cape Town. Today I am on the same inspirational theme of “Use your stash”, this time focusing on tools. And again it's apologies. I got my (sick) computer back yesterday afternoon, without any software. I managed to get everything installed by late Sunday evening, and fortunately had backups of most of my post but not all of my pics are available today.
OK, I confess. After craft shops, my favourite shops are “Do it Yourself “. I am passionate about all types of tools such as sanders, drills, staple guns; you name it I’ve got it. I do have 3 electric sanders!!! But I need them ALL. So when it comes to crafting tools, what are the tools that we really cannot do without? We had a survey amongst the team and came up with the following to share with you today: tools we cannot do without, tools we need, how many we need; pens, brushes, glues, hardware, software, etc.
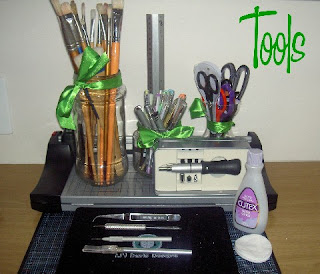
Tools we cannot do without:
'
This is what some of the design team has to say about tools they cannot do without:
Andrea: I can't live without my EK Success retro flower punch, EK Success corner rounders and my sewing machine.
Caz: craft knife, paper trimmer, crop-o-dile
Di: Apart from the obvious ones, I cannot do without my Making Memories paper trimmer, computer, printers and software. Oh and I am beginning to LOVE my camera.
Jo: I also cannot do without my retro flower punches, and CM corner rounder!! Wouldn't be without my Zision trimmer/scorer - use them ALL the time.
Maria: Paper trimmer, Soft cloth - not exactly a tool but I always get paw prints on my piccies, Paper piercer - can't get brads in any other way
Trish: My corner rounder and paint brushes are the main things I could not do without.
Tools and consumables that we need - the obvious ones:
Adhesives
Brushes
Bone Folder
Craft knife
Cutting mat
Eyelet setter
Paper piercer and pad
Paper trimmer
Pens and pencils
Ruler (metal)
Scissors
Tweezers
Thought I’d talk about just a few of the obvious ones:
Adhesives:
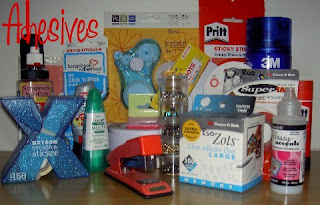
As you can see, I love sticky stuff, and have loads of it. But what do we really need? These are just a few of the adhesives that I find useful.
Book Binding Tape: I use this when making mini albums, to join pages together.
Click n stick (Scrapbook Adhesives) I use this when attending a crop and have to be quick. I use it to attach PP to CS and for matting.
Double sided tab dispenser (We R Memory Keepers): This gadget is refillable. I use it when attending a crop and have to be quick. Use it to attach PP to CS and for matting.
Double sided tape (in 3 different widths), (Caz told me that you can tear double sided tape but it doesn’t always work with the tape that I buy in South Africa). I use double sided tape to attach PP to CS and for matting pics. I use the very narrow one when making envelopes, attaching narrow ribbon, and for making sure that my chipboard letters are well and truly stuck down...
Double sided super tape (Therm O web): Great for attaching glitter and tiny beads. It also comes in sheets so you can cut out a shape, attach to your paper then sprinkle with glitter or beads.
Glue dots (Zots): I use glue dots for attaching embellishments.
Hermes roll on thing: Because of my budget, I only use Hermes type adhesives when I attend classes and have to be quick. OK I know they are great to work with, but quite frankly, I just find them too expensive to use daily. (By the way, I have not yet found a need for temporary adhesives.
Pritt Gel and Tombo: I use these interchangeably for sticking liitle things like buttons.
Pritt stick: I do not use this.
Podge: I use podge normally when attaching fabric e.g. to paper, chipboard and altered art stuff. Also use it to attach cardstock and paper to wooden items, and for protecting a finished altered art piece. By the way a roller is useful when using podge to be sure you get everything perfectly smooth.
Quick Stik (Quck Kutz): Woo hoo, my new favourite toy, the "quicker-poker-picker-upper" is just great for picking up little things with its tiny sticky point.
Vellum runners: I have always had a problem with attaching Vellum. It seems that even the adhesive designed for Vellum sometimes shows through so I either use brads, or attach the vellum with double sided tape and then cover where I have attached it with ribbon or patterned paper.
Xyron Create a sticker: Whopee, have just "found" this hiding in my stash. My Sizzix was lying unused getting dusty. I have only one font and found it painful sticking down the letters. The Xyron works like a dream!
So what else do we use as an “adhesive” for attaching stuff? Stapler, needle and cotton, sewing machine, gem clips (plain and fancy), tiny bulldog clips, pins (not really fond of them), brads, ribbon....
While we are taking about sticking stuff, how about UNSTICKING it… I use Scrappers Solution by un du, and I guard it carefully. It’s really difficult to buy here in Africa.
Caring for your adhesives: Need I say put the tops back on?
Storage: Oh dear, I have recently moved my studio into a spare bedroom. And guess what, the sun melted my glue dots. So yes keep them out of the sun. I like to keep all of my adhesives together.
Just one last thought on adhesives. Have you had trouble attaching really sheer ribbon? Well here are a few ideas
Do NOT stick it. Stretch it across your CS or PP and attach at the back, out of sight.
Alternatively cut slits in the CS or PP, push the ribbon through the slits and again attach at the back.
Brushes:
You must have a least ONE!!!. Must admit, I would rather have just 1 good brush than loads of cheap ones. I use my brushes for painting paper, wood, chipboard letters, wooden letters etc., and of course for podging.
Caring for your brushes: I try to wash my brushes between coats of paint (or podge). My mother, who was an artist (and a perfectionist), had the cleanest brushes you have ever seen! She used to wash them using a bar of sunlight soap. (Of course when she was working with oils, she cleaned them first in turps.) Mum used to hold the bar of soap in her left hand and squish the brush around in the soap, rinsing every now and again, until the brush was pristine clean. Guess what; she bought new brushes because she wanted them, NOT because she needed them. Mine are NOT pristine, but they are not getting worse..…
Storage: I keep my brushes in an old coffee jar. Mmmm perhaps I should try the nifty Maria’s techniques and paint the jar!!!
Paper Trimmers:
Ok we all have our favourites. I love my Fiskars paper trimmer. It’s neat, light and great for crops. I have had mine for about 2 and a half years and all I do is replace the blades. However. I LOVE my Making Memories paper trimmer (mwah), with its magnetic ruler. It is self sharpening. (Mine is only a year old so I’ll let you know how it goes.) I normally use the MM trimmer only at home. It’s a bit bulky to take to crops. Yes, it’s a bit more expensive, but well worth it. Must admit I am not really turned on by ‘cute looking’ trimmers.
Caring for your paper trimmer: Guess they very much take care of themselves. The only advice I can offer is to have a supply of blades. I can tell by the sound of my Fiskars when the blade is getting dodgy. I normally buy 4 at a time and no, they do not have a “sell by / use by date”. You can never have too many spare blades.
Pens:
Oh dear. Yes you can have too many pens! If you do not use your pens they will end up past their “use by date”. You may need pens for journaling (unless you do it all on the computer). I normally buy 2 at a time and prefer pens that show me how much ink is left. If you sketch your designs, then you may need coloured pencils or felt tip pens.
Caring for your pens: Go and test all your pens and throw away the ones that do not write.
Storage: I keep my pens in a glass jar out of the sun.
Scissors:
Well how many do you need? I need a minimum of 5:
Paper (“Decoupage scissors”)
Ribbon scissors
Fabric scissors
“glue “scissors (for cutting double sided tape)
Kitchen scissors for opening packaging (apart from the normal kitchen usage).
But, having said that, mmmm, I do have 8 pairs of scissors.
Caring for your scissors: Firstly, use them ONLY for what YOU intend to use them for. I.e. Do not use your ribbon scissors for cutting double sided tape! Do not use your fabric scissors for cutting paper. And finally, clean your “glue” scissors after use. I clean mine using nail polish remover and cotton wool pads. Guess you do too. If it doesn’t damage your nails, it should not damage your scissors!!! Because I live alone, I have only myself to blame if “something” happens to my scissors. If I had a husband and or children I would lock them up – the scissors I mean.
Storage: Again I keep my pens in a glass jar. At the bottom of the jar I have a piece of wadding to protect the points. My dressmaking scissors are stored separately with all of my sewing stash.
What Hardware and Software do we use?
I have a notebook (laptop), an HP Printer Copier Scanner (PSC), and a cute HP photo printer. I normally replace my printer every 12 to 18 months. I just get fed up replacing those expensive cartridges. (Oops that may change since I have retired LOL) For imaging software I use HP Image Zone (which was provided with my printer), but have recently been experimenting with Microsoft Digital Image Suite 2006. I have found it really easy to use and it creates really small piccis for display on the web. I am also testing Adobe Photoshop Elements. (Mmmm will let you know what I think.) For journaling and creating titles I occasionally use MS Word.
There are of course some “odd tools” that come in handy every now and again:
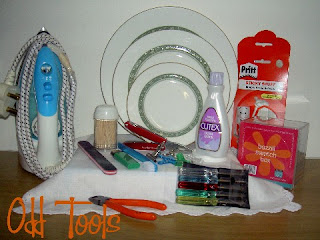 Bazzill Swatch Box:
 Because I mostly buy cardstock in stores, it helps if I prepare before shopping and decide what colours I need. It costs about R320 (about 22 pound sterling), but it was a good investment.
Bulldog clips (small): Use when constructing a layout to hold things in place. Also use to hold the pages of a mini album together. I do this to be sure I get all the holes in the right place.
Cigarette lighter: Use for singing the end of ribbon to prevent it fraying. Darning needle (large): Use if you do not have a paper piercer.
Emery board: Use to distress chipboard letters, paper photographs etc..
Iron: Well it’s obvious isn’t it!! Use it to iron your ribbon, fabric, patterned paper etc.
Nail polish remover: Use for cleaning “glue scissors”, tweezers and whatever else you get that sticky stuff on.
Plates (round or oval): Use for cutting circles. I lay the plate on the back of the cardstock or patterned paper, secure it with a little “Pritt sticky stuff “(Tic Tac) and cut around the plate with my craft knife. Voila Viola, a perfect circle. Pritt sticky stuff (Tic tac): Use for holding down your plates when cutting circles.
Screwdriver: I have a teensy set of screwdrivers that came from a Christmas cracker! I would love a little magnetic screwdriver which is great for removing little screws when doing “altered art’ stuff.
Toothbrush: Use for cleaning stamps. Tooth pick: Use for cleaning the nozzles of your glue and to spread glue on tiny buttons. Wirecutters: I just use them for cutting wire lol.
And Finally, my Leatherman Juice !!
So, what about the tools you no longer use?:
Pack them all in a box and put them in the loft – free up the space.
Swop them with friends. Sell them.
Throw them in the bin. (Are you allowed to do that???)
Donate them as a Random Act of Kindness….
(If you no longer use them, chances are you have something better, so GET RID of them.)
We’d love to here what tools you cannot do without so keep posting your comments. We value and enjoy hearing from you!
Thanks for reading with love from Di XXX

 To decorate the front of the address book I used a Heidi Swapp chipboard letter, stamped the letters to make the word friends with teeny tiny alphabet stamps and tied co-ordinating ribbon around the wire binding.
 The tabs down the edge of the book were made by cutting white card into roughly 1 inch squares, inking the edges, gluing on a flower punched from patterned paper and using small round alphabet stickers as the flower centres and to indicate each letter of the alphabet. I used my normal office stapler to join the tabs onto the pages of the book.
 Don't tell her, but this is one of the end of school year thank you presents for my nursery nurse - hopefully she won't visit the blog for a couple of weeks!!