
 I hope I have inspired you today, enjoy playing
Trish xxx
I hope I have inspired you today, enjoy playing
Trish xxx
Saturday, August 18, 2007
Altered Clipboard – Blackboard
Hello all, hope you are still enjoying what we are bringing you each day. Today I am doing an altered clipboard with a bit of a twist, I am sure a lot of you have already played with altering clipboards with paint, paper and photos, but today I am turning one into a blackboard to use as a shopping list because I know that whenever I do a list at the last minute to go shopping I ALWAYS forget something, well not anymore I write down things we need as we are running out then transfer it to my paper list to take with me.
I started with a plain MDF bingo board, you can usually find these in pound stores, I started by sanding down the edges a bit as they were a little rough, then gave it a coat of white acrylic paint, just roughly painting it. When it was dry I gave it the first coat of blackboard paint, mine is by International and was bought at FOCUS, it takes 2 hours to be touch dry and needs a good 16 hours before you apply the second coat. I painted back and front with two coats. When your blackboard is completely dry you can decorate it as you wish, I used Moda Fabrics paper by DaisyD’s in a vintagey style of pale blue and pink to cut the title, cream cotton lace for the border and lashings of pink and pale blue ribbons of all different weights and designs. I punched a hole in the bottom left corner using my cropadile for some ribbon to hold the chalk and just tuck it into the bow to stop the kids from fiddling.
I hope I have inspired you today, enjoy playing
Trish xxx
I hope I have inspired you today, enjoy playing
Trish xxx
Friday, August 17, 2007
Layout Class
Hi everyone! Cath here with another VERY easy multi photo layout.
For this layout i used 5 photographs, the equivalent of 3 x 6x4 pictures.
Apologies for the poor photograph, my scanner is not my best friend!
 Supplies :
KI Memories Green color theory paper
CherryArte chipboard alphabet
American Crafts Alphabet Stickers
Sticker studio Alphabet stickers
Bazzill Cardstock
So like i said, this is amazingly simple.
I cut out a smaller piece of coordinating cardstock for the centre and inked both with black.
I matted the photographs on black bazzill, this makes them stand out a little bit.
The title was then just placed bottom right but you could actually put it anywhere as there is a lot of space.
I computer printed the date and place and also some journalling and placed this top right and bottom left.
I've left the top left free but you could put some embellies there if you wish.
So, a very simple layout for when you have an hour or so spare!
Supplies :
KI Memories Green color theory paper
CherryArte chipboard alphabet
American Crafts Alphabet Stickers
Sticker studio Alphabet stickers
Bazzill Cardstock
So like i said, this is amazingly simple.
I cut out a smaller piece of coordinating cardstock for the centre and inked both with black.
I matted the photographs on black bazzill, this makes them stand out a little bit.
The title was then just placed bottom right but you could actually put it anywhere as there is a lot of space.
I computer printed the date and place and also some journalling and placed this top right and bottom left.
I've left the top left free but you could put some embellies there if you wish.
So, a very simple layout for when you have an hour or so spare!
 Supplies :
KI Memories Green color theory paper
CherryArte chipboard alphabet
American Crafts Alphabet Stickers
Sticker studio Alphabet stickers
Bazzill Cardstock
So like i said, this is amazingly simple.
I cut out a smaller piece of coordinating cardstock for the centre and inked both with black.
I matted the photographs on black bazzill, this makes them stand out a little bit.
The title was then just placed bottom right but you could actually put it anywhere as there is a lot of space.
I computer printed the date and place and also some journalling and placed this top right and bottom left.
I've left the top left free but you could put some embellies there if you wish.
So, a very simple layout for when you have an hour or so spare!
Supplies :
KI Memories Green color theory paper
CherryArte chipboard alphabet
American Crafts Alphabet Stickers
Sticker studio Alphabet stickers
Bazzill Cardstock
So like i said, this is amazingly simple.
I cut out a smaller piece of coordinating cardstock for the centre and inked both with black.
I matted the photographs on black bazzill, this makes them stand out a little bit.
The title was then just placed bottom right but you could actually put it anywhere as there is a lot of space.
I computer printed the date and place and also some journalling and placed this top right and bottom left.
I've left the top left free but you could put some embellies there if you wish.
So, a very simple layout for when you have an hour or so spare!Creative children

Hi, It's Maria here again. Just popping in to let you have the details of our campaign to get all of our children creating.
We would love to see the masterpieces that your children create. All you have to do is email their masterpiece and a few words about them to acreativeworld@hotmail.co.uk before 31st August.
Every child will receive a certificate from us and ONE LUCKY WINNER WILL RECEIVE A £20.00 VOUCHER FOR THE EARLY LEARNING CENTRE.
£20.00 to spend on whatever takes their fancy. All the names will be put in a hat and the winner will be announced here on Sunday 2nd September.
We look forward to seeing your child's masterpiece soon.
Toodle pip
Thursday, August 16, 2007
Cardmaking
Today's card is a pretty pastel Birthday card but could easily be adapted to suit Get Well Soon, Retirement, Anniversary etc.
The papers are again from The Shabby Princess. The online shop is packed full of scrumptious goodies - I can never resist buying extra kits!! Today I used papers from Misty Morning and Our Little Prince.
I've also used my craft robo - don't worry though if you haven't got a papercutting machine, before I bought mine I was quite nifty with a small, sharp pair of embroidery scissors.

(Shabby Princess Papers, Doodlebug Paper Frills, FooFaLa button, Hockey is Lif font)
I cut the plaid paper to size for my card, inked around the edges with charcoal chalk ink and attached to my card stock. A small plate was just the right size to give me a nice curved edge on the green spotted paper and I used my scalloped decorative scissors to give it a patterned edge. I stitched around the green shape on my sewing machine before inking the edges and gluing to my card. Cut a strip of blue spotted paper, ink the edges and glue a decorative paper strip to the back and I used another decorative paper strip glued along the card near to the bottom.
Using my Craft Robo I cut out the paper flower using Saru's flower ding font and also the letters to spell out Happy Birthday - Rubber stamps, letter stickers or die cut letters would look equally as good or have a go at hand cutting.
The finishing touches were a quick doodle around the petals to define the flower and a pink button which lifted the colours.
Love from Andrea x
Wednesday, August 15, 2007
Seaglass Pictures
Here is a quick project that gives you something a little magical at the end....
Materials: seaglass, a photo trimmed to the seaglass, a melting pot, a non-stick surface, UTEE, water, and tweezers (for the melting pot). My photo was from my inkjet printer.

Put the seaglass in the melting pot, and turn it on to the UTEE setting.

Pour UTEE over the top of the glass. When it has melted, use the tweezers to remove it from the melting pot onto the non-stick surface. Quickly place your picture face-down into the warm UTEE side of the seaglass. Gently rub it into the UTEE. (I used a brayer.)
Wait 5-10 minutes for the piece to cool. Then use water and lightly rub off the picture/image until all of the paper has been removed. It should leave a lovely, transparent image in your glass.
Next, place the piece picture side up back in the melting pot. Add UTEE to the top again and let it melt. This will give the seaglass picture some depth, and it helps to make it more transparent. After it has melted, use tweezers to remove the glass, and put it on the non-stick craft sheet.
Here is my piece:

And a big thank you to my pal, Angela, http://angelabelfastgirl.blogspot.com/ who, when I suggested this, told me (being slightly unsure) to go for it (and is the source of all melting pot knowledge!) :0) Angela has a special guest project for you on the 28th August, too. xxxxxxxx Joy
Tuesday, August 14, 2007
Crafty children
Hi, it's Maria here again. Thank you to Caz and Di for the fab crochet tips. I will be having a go but anyone who has ever seen my attempts at crochet will be laughing into their gin and tonic. I'm really looking forward to seeing Caz's blanket grow and I may even share my attempts.
Back to today. I'm looking at children's crafts and we have another masterpiece to feature.
We love this canvas created by 4 year old Josh Gowdy. Mum, Paula, said *I gave him a canvas, paint, photo of him and his brother and free reign of my stash to keep him occupied while I scrapped and this is what he came up with. It made it even more special when he declared he had made it for his baby brother Dylan's nursery wall!*.

How cute is that and what a superstar thank you so much for sharing Paula.
Don't forget that you still have time to send us something created by your child. Simply email their masterpiece to us at itsatcreativeworld@hotmail.co.uk Every child will receive a certificate and there will be a surprise for one lucky artist.
My girlie wirlies discovered the fabbiest thing while shopping at Hobbycraft last week. The Crayola Colour explosion kit. The kit contains a book of black paper, stencils and two clear ink markers. All you need to do is draw or write on the paper and a rainbow of colours appears before your eyes. It kept them busy for ages and I must confess to having a little go as well.
If you click on the link have a look around the site as they have lots of activites to keep your children busy on a rainy afternoon.
I thought that I would share a few more of my favourite sites for fab crafting ideas.
Activity-village - Over 3,000 pages of activities so you're sure to find something that appeals.
Bead-Merrily - If you're children love Hama beads as much as mine this is the site for you. Ok, it is a retail site but Merry provides lots of FREE patterns for your children to use.
Finally, a top tip for heading back to school - Get a sheet of photo stickers from Photobox and use them to label book bags, backpacks and notebooks. Your child will easily spot their piccie in the scrum for the bags etc .....
Toodle pip
Monday, August 13, 2007
Get Hooked
on crochet!!
So a few months ago I got it into my head to crochet blankets for my nieces for Christmas. Now while I thought this was a fantastic plan, my one small problem was that I couldn't remember how to crochet! And I had no idea how to plan such a huge project. Thank goodness my Darling mother, Di, planned a trip to the UK this summer, so she could teach me while she was here :)

Here is one she made earlier, lol. It's my winter 'lying on the couch watching TV all wrapped up' blanket and I wouldn't be without it! I love it and I plan to have it forever and hopefully one day it will be passed down a generation.
Last Thursday was 1st lesson day and mum and I started slowly, and we crocheted together, side by side and went at the same pace so I could ask questions if I got stuck. We each made 9 squares and put them together so I could see the whole process from start to finish. Mine is the purple 'blanket' :) (It's a bit bigger and looser cause I used a 5mm hook)

Recommended wools:
Acrylic
100% colour fast
Machine washable
Stitches we will use: We will start with 3 simple stitches:
sl st (slip stitch)
dc ( double crochet)
ch (chain)
Crochet Hook
Size 4 mm
Learn the basic stitches:
chain stitch
http://learntocrochet.lionbrand.com/cgi-bin/faq-search.cgi?store=/stores/eyarn&faqKey=115
double crochet
http://learntocrochet.lionbrand.com/cgi-bin/faq-search.cgi?store=/stores/eyarn&faqKey=117
slip stitch
and we have our first square
For a blanket that is 14 x 16 rows, which we think will be good for a single bed, we plan to use 14 balls of wool, 2 each of 5 colours and 4 of the colour that will surround each square and will be used to 'stitch' the blanket together. We will need 224 granny squares.
I bought my wool at Wilkinsons for 79p a ball, which is a bargain.


Some tips from Di:
You will make approximately 27 squares from one 100gm ball of wool.
Start crocheting from the inside end of the wool

Crochet your ends in and cut off ends after you finish each square.
 When you get up to speed, you should make 1 square in about 15 minutes.
Common Terms and Abbreviations:
This is a list of common terms and abbreviations that you will come across when reading crochet patterns. Learning these terms and abbreviations is a huge step towards reading a pattern.
beg: begin(ning)
ch: chain
dc: double crochet
dec: decreas
eest: established
hdc half double crochet
inc: increase
lp(s): loop(s)
rep: repeat
rev sc: reverse single crochet
rnd: round
RS: right side
sc: single crochet
sl st: slip stitch
sp(s): space(s)
st(s): stitch(es)
tog: together
tr: treble crochet
WS: wrong side
courtesy of http://craftydaisies.com/2007/05/22/learn-to-crochet-lesson-1/
Links to other sites with explanations
http://craftydaisies.com/category/learn-to-crochet/
all lessons
http://learntocrochet.lionbrand.com/
http://blogher.org/node/20586
http://www.learntoknit.com/instructions_cr.php3 crochet instructions
http://www.roxycraft.com/learntocrochet.htm
http://www.anniesattic.com/free_pattern_day/Baby_Granny_Afghan.html
free pattern baby granny afghan blanket
http://www.crochet.com/
crochet guild of america
Since starting this project last Friday we have been so busy making our squares that we are almost half way through the first blanket! And the plan is to have all the squares done by the time mum leaves the UK next week. It has been amazing to see it grow so fast and I can't wait to lay the squares out to get an idea of what it will eventually look like. Obviously the second blanket will not grow quite so quickly but I have at least 3 months to make it so I am not panicing yet :)
I'll be doing monthly progress report posts (mid month Monday) to show you how I am getting on, and explain how we put the finished squares together, so if you fancy joining me, pop down to your local store to pick up your wool today! Love Caz (and Di :) )
xx
Sunday, August 12, 2007
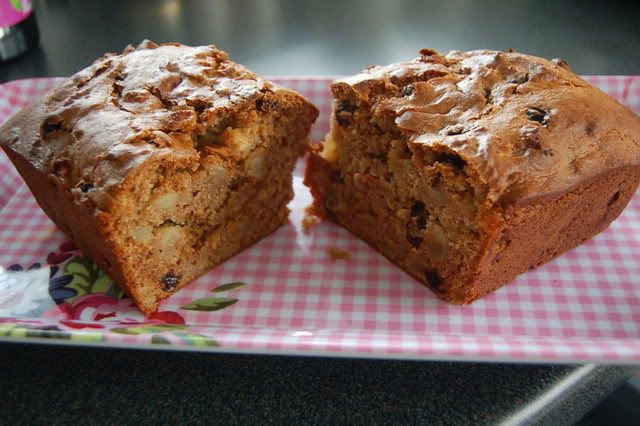
Another recipe - Apple Loaf Cake
Hiya, it's Cath here :)
Thought i'd give you a little recipe today. I make this all the time and it never lasts more than 48hrs, very scrummy! And it's really, really quick and easy to make too!
 Heres the recipe -
1 Egg
8floz(250ml) Bottled or Homemade apple sauce
2 oz(55g) melted butter or Marg
3 3/4oz(110g)Dark brown sugar
1 3/4oz(50g)Caster sugar
10oz(285g)Plain flour
2 tsps Baking powder
1/2 tsp Bicarbonate of soda
1/2 tsp salt
1 tsp Ground cinnamon
1/2 tsp Ground Nutmeg
2 1/2oz(70g) currants or raisins
2oz(55g) Chopped pecans or walnuts
1. Preheat the oven to 350f/180c/Gas mark 4. Line a 9x5 in loaf tin wih greaseproof paper and grease.
2. Break the egg into a bowl and beat lightly. Stir in the apple sauce, butter and both sugars. Set aside.
3. In another bowl sift together the flour, baking powder, bicarbonate of soda, salt, cinnamon and nutmeg. Fold the dry ingredients into the apple mixture in 3 batches.
4. Stir in the currants/raisins and the nuts.
5. Pour into the prepared tin and bake until a skewer inserted in the middle comes out clean(about an hour). Let stand for 10 mins. Turn out onto a rack and let cool.
And if you want to turn recipes and cooking into scrapbooking why not scrap your recipes and turn it inot a Recipe Journal which is what I am planning on doing!
Heres the recipe -
1 Egg
8floz(250ml) Bottled or Homemade apple sauce
2 oz(55g) melted butter or Marg
3 3/4oz(110g)Dark brown sugar
1 3/4oz(50g)Caster sugar
10oz(285g)Plain flour
2 tsps Baking powder
1/2 tsp Bicarbonate of soda
1/2 tsp salt
1 tsp Ground cinnamon
1/2 tsp Ground Nutmeg
2 1/2oz(70g) currants or raisins
2oz(55g) Chopped pecans or walnuts
1. Preheat the oven to 350f/180c/Gas mark 4. Line a 9x5 in loaf tin wih greaseproof paper and grease.
2. Break the egg into a bowl and beat lightly. Stir in the apple sauce, butter and both sugars. Set aside.
3. In another bowl sift together the flour, baking powder, bicarbonate of soda, salt, cinnamon and nutmeg. Fold the dry ingredients into the apple mixture in 3 batches.
4. Stir in the currants/raisins and the nuts.
5. Pour into the prepared tin and bake until a skewer inserted in the middle comes out clean(about an hour). Let stand for 10 mins. Turn out onto a rack and let cool.
And if you want to turn recipes and cooking into scrapbooking why not scrap your recipes and turn it inot a Recipe Journal which is what I am planning on doing!

Subscribe to:
Posts (Atom)