Saturday, June 16, 2007

Art Room Sign... MeSsy pLaY

Hi, it's Joy here, *waving madly* at everyone!!!! It’s time for some
MESSY play. This project is just about letting yourself go… and only doing a little bit of creating at once
say for 15 minutes… then putting it down and coming back to PLAY a little bit more. You have to stop to let stuff dry, but it will also give you time to let your CREATIVITY do leaps and bounds while you see what directions this project takes you. And it can be ANY STYLE. Do what YOU like. And please leave me a link so I can see it. :0) Materials You can do this with ANY MATERIALS – there are NO RULES for messy play :0) But I will let you know what I used just for fun…. Small canvas board Scraps (I used painted hearts (oils but any will do) as things to add to your sign.) Queen of clubs (face and hair) Traced stamps and images for wings and dress Artgirlz crown Artgirlz and Blonde Moments rubber stamps Clear embossing powder Glossy accents Brilliance ink. Versamark ink Microbeads Glue (I like thicky sludgy mod podge or gel gloss, but use what you like)
PAINTS – Use any acrylic paint (something thick to give you texture). Also metallic paints are good for highlighting. I used twinkling H20s, lumieres, acrylics (Ranger), Stewart Gills, watercolour crayons.
Melting pot – wax, UTEE (or both) Paper (to be painted)
Ribbon
Hole punch
Baby wipes to clean stamps and your fingers…
Cling film technique – Collage Discovery Workshop – Beyond the Unexpected
The Messy Play Adventure Preparing….15 minutes or so…. PAINT your sign (canvas board or card – anything sturdy) first. Just do one layer – one or two colours. Also PAINT your paper in varied colours. You’ll make BEADS out of it later. LEAVE it all to dry. FIND your scraps. I chose previously painted hearts. Any thing you like will do – paper, images, leftover pretty things… Whatever calls out to you. GATHER your favourite stamps and paints and set them in front of you for inspiration. Adding…Part 1… 15 minutes… Everything should be dry now. :0) ADD some more layers of paint to your canvas. I used watercolour crayons (colours dipped in water – GREAT FUN!!!!)

to streak colours and draw hearts (not visible in the final canvas). I think used thick acrylic paint and cling film to create texture in various paints. This technique is described in detail in Collage Discovery Workshop. http://www.amazon.co.uk/Collage-Discovery-Workshop-Beyond-Unexpected/dp/1581806787/ref=sr_1_13/203-2622484-6921513?ie=UTF8&s=books&qid=1181495295&sr=8-13.

Now is also the time to cut and ROLL your paper to make beads (use your glue). Leave everything overnight to dry. Adding… Part 2… 25 minutes. Start adding images and texture. Stamp and emboss… Put your main image on and colour with paint, ink, markers, anything you like. Squish it, make dots, make swirls, use as many colours as you would like. Paint over things, add in paper, just PLAY. I added the queen and hearts at this stage and some stamped words (“dream it, see it”- Artgirlz http://www.artgirlz.com/ and “Create, Play, Enjoy” – Blonde Moments http://www.blondemoments.com/ ). If you use paint – leave it overnight again.

Adding… Part 3 – 20 minutes. This is all about adding LAYERS and building up images that you like. I then stamped over my scrap hearts and embossed them with gold brilliance ink. I added more embossed (Artgirlz) stars and moons over the painted board. I used clear embossing powder on everything. You can keep going until you are happy. And the best part is if you don’t like – you can work over it. :0)

Adding… Part 4 – 20 minutes. More texture…. I have to confess that this was an accident. I wanted to use UTEE, but I couldn’t get my wax out of my melting pot. So I added UTEE and flex to the wax and melted it all together!!!!! I inked my stamps with Versamak at the same time. I used my melting tool spoon to pour bits of wax on the canvas, and then I put my inked stamps in and pressed…. When I took them out, I gently highlighted them with metallic paints. Beads… 15 minutes.

You can add as much as you want. :0) When you’re done with your sign, make two holes in the board to string some ribbon through. Weave your beads through the ribbon, and tie it off. You know have a dedicated art room (or other) messy play sign to lift your spirit.

We hope you're all enjoying reading our blog and picking up some ideas for projects of your own. Leave a comment for us today or tomorrow for the chance to be entered into a draw to win a *fantastic* kit from the fabulous ScrapaGoGo!!

Friday, June 15, 2007

Father/dad-themed layouts...

Hello! It’s Jo here, extending a warm welcome to you all to my first post for It’s A Creative World. As it’s Father’s Day in the UK on Sunday, I thought I would take this opportunity to share some father/dad-themed layouts with you. I don’t know about you, but my children seem to get the lion’s share of my scrapping time, and I thought it would be appropriate to redress the balance a little, and scrap some of the many photos I have of my dad, and my daughters’ daddy! I haven’t done these as step-by-steps, as hopefully it’s fairly easy to see what I’ve done in each case, but there may be one that catches your eye and encourages you to go and scrap one of the men in your life! Layout 1 - my dad, my daughter:
my-dad,-my-daughter-3 Supplies: Bazzill Doodlebug cardstock, 1 sheet sugar cookie, 1 sheet cream puff; foolscap paper; Ki Memories ‘Pieces of Me’ rub-ons; orange and black Sakura Gelly Roll glaze pens; Cropadile Layout 2 - a father’s love – this layout was completed during a UK Scrappers cybercrop, and was from a class designed by Theresly, aka Shopperholic. Thanks to Theresly for permission to reproduce it here:
a-father's-love-1 Supplies: Deja Views Fresh Print patterned paper, Tangerine design; Bazzill Doodlebug cardstock, 1 sheet pumpkin seed, 1 sheet honeydew; Sue Dreamer letter stickers; Ki Memories rub-ons; embroidery thread; purple silk flowers; purple Bazzill brads Layout 3 - *funky dad!:
funky-dad-3 Supplies: Bazzill Doodlebug cardstock, 1 sheet lily white, 1 sheet swimming pool, 1 sheet buttercream; Sandylion Kelly Panacci patterned paper, 1 sheet Denim Daisies, 1 sheet Miniature Daisies – Vanilla; Poundland chipboard letters, inked with ColorBox dark brown chalk inkpad; Basic Grey Wholly Cow ‘summer’ rub-ons; Ki Memories ‘Pieces of Me’ rub-ons; EK success retro flower punches - Whale of a Punch, and mini punch; gold snaps; Cropadile Layout 4 - our daddy:
our-daddy-2 Supplies: Bazzill Doodlebug cardstock, 2 sheets lily white; cherryArte Tropics patterned paper, 1 sheet Flower Power; circles cut from Provo Craft Christina Cole patterned paper, 1 sheet Rainbow Dots; Making Memories Simply Stated alphabet rub-ons, ‘destination’ white; black and yellow Sakura Gelly Roll glaze pens; Woodware circular punches; Cropadile If you have any father/dad layouts you’d like to share with us, please leave a link in the comments box – we look forward to seeing all of your lovely creations! We have another exciting prize draw to unveil over the weekend, so please stop by if you have a minute!

Thursday, June 14, 2007

Quick and easy Fathers Day cards...

My Dad doesn't play golf or football or go fishing or sail or do any of those things that you find on the front of Fathers Day cards when you buy them from the shops. He likes colourful things - especially yellow and red and designs that are simple and not too fussy. This is just as well as to be honest, normally by the time I have made ten plus cards for special orders for other people I am usually fresh out of inspiration and time and he gets whatever I can make on the Sunday morning before he comes in from church.
Not this year though - I am organised!! His cards (one from me, one from my brother) have been in my card box for a couple of weeks all ready for this coming Sunday.
Card 1 is bright, colourful and easy to make. I've used Shabby Princess papers and printed the same pattern in different sizes. Cut the striped background to size, ink the edges and adhere to your card blank. Cut a strip of the circle paper and ink and adhere that too and then stitch around the edges on a sewing machine. I handcut the word 'dad' using Mandingo font and added some doodling around the edge to make it stand out. The photo turns are hand drawn and these and the letters are attached with foam pads. Finally I stamped my 'Happy Fathers Day' message, cut out and inked the edges and glued onto my card.

Card 2 is really simple to make. I covered the front of the card blank with Christina Cole rainbow striped paper and inked the edges. I used my bone tool to fold and crease a sheet of acetate and scalloped the edge with my EK Success corner rounder. I attached it on the back of my card with double sided tape and then traced along the scallops with a fine permanent pen. I painted some chipboard letters with a tester pot of emulsion paint from B&Q and when it dried I drew around the edges of the letters with a black pen and glued these to my acetate cover. Some ribbon and a few prima flowers finished my card

I hope you all have fun making cards this week and if you aren't making Fathers Day cards you can still use these ideas and adapt them for birthdays, good luck messages or get well soon wishes.

Love from Andrea x

Wednesday, June 13, 2007

Sometimes we all need inspiration...

Of course the best place to go for inspiration is right here on the Creative World blog! But what inspires the Creative World girls when the creative juices stop flowing? We have a few favourite places that we visit from time to time to soak up the creative vibes and influences of other designers and we thought we would start a list over there ------> of blogs to visit. Each week we will add to the list.
Betz White - have you seen what this lady can do with a few old knitted jumpers? This post inspired me to make my little bunny pin cushion that usually sits on my desk keeping my pins safe (unless of course he's having his own little photoshoot in the garden).
Posy Gets Cosy - We love her photographs, her use of colour, her recipes and her inspiring crafty creations and we all want a craft room like Alicia has!
Pam Garrison - Gorgeous photographs of her flea market finds. Whenever I visit her blog I have wonderful images going around my head of all the fantastic crafty things I could make if only my local market was half as interesting as hers obviously is!!
The Scent of Water - Megan writes beautifully, and takes the most gorgeous photos. She's also a dab hand with a needle and thread, bakes, and is eco-conscious.
Jen Hall - If you like doodles, flowers, ribbon and colour you have to visit Jen's blog and feast your eyes.
Patterned Paper Princess - We love Paula's photographs and her scrapbook pages. There is alsways something to inspire great things in your craft room!
Rebecca Sower - Gorgeous photographs, inspiring quotes and oodles of ideas for vintage and altered art.
Love Andrea x

Tuesday, June 12, 2007

Where to keep all those pens

Hi, It’s Maria here again. Thank you for all the lovely comments on my cube project. The cube is now strategically placed on Graham’s bedside table. It’s ready for the next time he keeps me awake snoring all night ……….. Hee hee!!!
Anyhoo, I’m back today wearing my thrifty but nifty hat. I think the biggest bugbear for most scrappers is storage. If you’re anything like me stash that is hidden away is forgotten about. I much prefer to store things so that I can see what I’ve got at a glance. But, it costs pennies. Pennies that could be better spent on pretties.
But, there is a way to save those pennies. Some of the jams and sauces come in the prettiest jars and it always seems a shame to just throw them away. So don’t!!! Recycle them into storage jars for your pens, buttons etc ……
I usually just pop a nice ribbon around the neck and leave it at that. If I’m keeping the lid a coat of paint hides the true identity of the jar. But, I also like to paint the insides of jars and old glasses with leftover paint or tester pots. It’s easy peasy and strangely relaxing.
Simply pour a small amount of paint in your jar or glass. Then, holding it horizontally slowly turn it and allow the paint to cover the inside. Keep turning until the inside is completely covered and then pour any remaining paint into another jar or back in the paint pot.
The glass in the photo is one of a set we no longer use and I may paint all of them and pop them on a shelf in the kitchen. They look pretty with a simple flower in each I did try tealights but you can't see them through the paint.
I’ve also used unpainted glass jars around the garden with tealights when we’ve had a bit of a soiree in the summer. They look so pretty with their twinkling light and they draw the eye from the more unattractive parts of the garden.
Don’t make the mistake I did one year of lining the garden path with them. Every guest thought they were being original asking when the plane would be landing …… Ho hum!!!
Oh, and if you’re worried about scratching the paint you could always pop a small plastic cup inside to protect it. And always leave them to dry for a couple of days.
I hope that you like my jars and I’d love to see any that you make.
Toodle pip
Ooh, Don't forget you've still got time to claim a whopping 15% discount at Scrapbook Central. Simply place your order before the end of the week quoting code GEYJE50.
Just to say that I only use the plain unpainted jars with the tealights and please be careful when using any candles or naked flames.

Monday, June 11, 2007

Recycle Your Chipboard Letters

Wow - I can't believe I am part of the wonderful design team at Its a Creative world" My name is Di, I am a crafter from Cape Town South Africa and the mad darling mother of Caz. This my first post on the blog so thought I would start by keeping it simple.

One of our inspirational categories is 'Use your Stash" - and we all have LOADS of stash. Each time I tidy my studio I spend more time oohing and aahing at the stuff I discover, than actually tidying. So today I am going to talk about using some of that forgotten stash by "Recycling your Chipboard Letters.

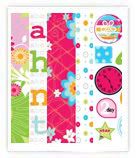
This is just a small sample of my HUGE collection of chipboard letters::

I NEVER have what I need and continually just buy new sets. I am now retired and have a much stricter budget (boo hoo), so have started to "Recyle my chipboard letters". I have included the tools and supplies you will you need, hints, examples of layouts created using recycled letters and of course what to doYour feedback is valuable to us so please continue to post your comments. So just for starters a Teaser - let us know what words you can create from the following letters: BeOYQHE, OaN, Bld, HQb

And just a little Bonus - whatever you can do with Chipboard Letters you can do with that HUGE supply of Die-cuts woo hoo.

Thanks for reading and have fun Using Your Stash Di XX

Tools you will need: Cutting mat, craft knife, metal ruler, pencil and a sanding block or emery board.

Supplies you will need: That huge collection of chipboard letters and optionally, paint, ink, and scraps of cardstock / patterned paper.

Hints: When you cut a piece from a letter, sand lightly where you have cut the piece off and touch up with a little ink or paint. Combine different fonts – it does not always matter. Combine upper and lowercase. If you have odd letters of different colours then paint them, ink them or cover them in cardstock or patterned paper. If you use different styles of letters then consider placing each on a small piece of cardstock to get a consistent look.

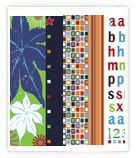
This is what your recycled letters may look like:

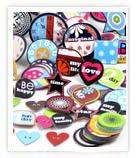
And here are just a few examples of where we have used recycled chipboard letters: 
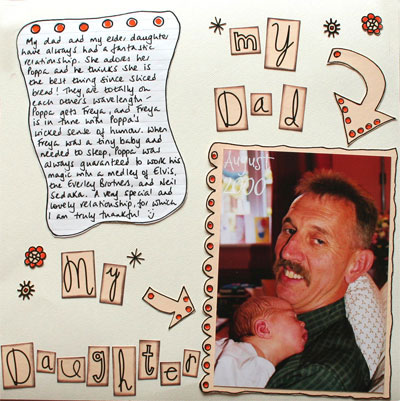
Here I have mixed different styles and fonts:

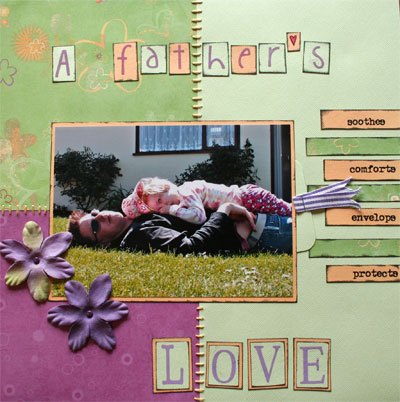
Here I have used upper case, lower case and what else???

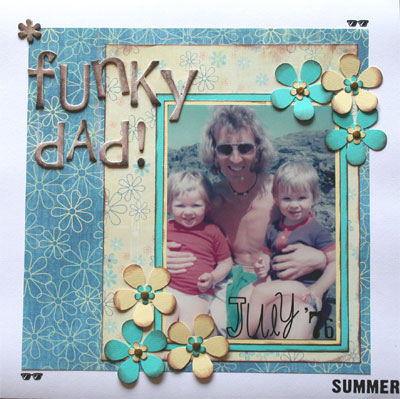
And here I have used upper case, lowercase and of course u where I needed an n - guess you noticed!!!

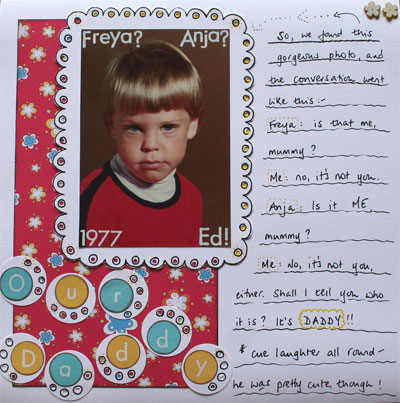
And here I have really cheated - 3 Ws because I had no Ms.

The awesome JO has used recycled letters on this card: And the intrepid CAZ has rchanged a K to I, b to P and handcut the S!

Now lets get to the nitty gritty. Here are just some of my ideas for recycling YOUR chipboard letters: a to o - cut off 2 pieces A to V - cut off 1 piece and turn it upside down A to I - cut off 1 piece and you get 2 !! b to d - turn it over b to a - cut off 1 piece and turn it upside down b to h - cut off 1 piece b to o - cut off 2 pieces b to I - cut off 1 piece B to a - cut it in half horizontally and you may get 2!! B to b - cut off 1 piece B to E - cut off 2 pieces d to a -cut off 1 piece d to b - turn it over d to p - turn it upside down D to I - cut off 1 piece E to F - cut off 1 piece E to I - cut off 3 pieces E to L - cut off 2 pieces F to I - cut off 2 pieces g to o - cut off 2 pieces G to C - cut off 1 piece H to I - cut off 1 piece and you get 2!! J to I - cut off 1 piece K to I - cut off 2 pieces and you get 3!! L to I - cut off a piece and you get 2!! M to W - turn it upside down M to Z - cut off 1 piece and turn it on its side M to I and V - chop it up and u get 2 Is and a V N to Z - turn it around N to I - cut off 1 pece and you get 2 or maybe 3 !! n to u – turn it upside down O to C - cut off a piece p to d - turn it upside down p to I - cut off 1 piece p to a - cut off 1 piece and turn it upside down P to d - turn it upside down P to I - cut off 1 piece P to a - cut off 1 piece and turn it upside down Q to O - cut off 1 piece R to P - cut off 1 piece R to I - cut off 2 pieces r to i - cut off 1 piece and add a brad for the dot T to I - cut off 2 pieces T to L - turn it upside down and cut off 1 piece U to I cut off 1 piece and you get 2 !! u to n - turn it upside down V to A - turn it upside down and add on 1 piece or add a small button V to I - cut in half and you get 2 !! W to M - turn it upside down W to I and V - chop it up and u get 2 Is and a V W to V - cut in half and you get 2!! W to Z - cut off 1 piece and turn it on its side X to V - cut in half and you get 2!! X to I - cut off 1 piece Y to v - cut off 1 piece Z to M - turn it around and add on a piece Z to N - turn it on its side Z to I - cut off 2 pieces Z to 7 - cut off 1 piece - think about 2007!! and you get an I as well 1 to I - just use it! 6 to o or 0 - cut off 1 piece 6 to 9 - turn it upside down 7 to 1 - cut of 1 piece 7 to I - cut off 1 piece 8 to o - cut in half and you get 2 !! 8 to s - cut off 2 pieces 9 to o - cut off 1 piece 9 to O - cut off 1 piece 9 to 6 - turn it upside down

Depending on the style of your chipboard letters, you will discover many more options The important thing to do is think about what you want,look at what you have and get creative! You are limited only by your imagination so go for it and "Use your Stash".

P.S. where I have referred to lower case 'a' above I was thinking of a 'comic sans' style 'a', which I cannot seem to type in this post!

Just a reminder to respond to my teaser - let us know what words you can create from the following letters: BeOYQHE, Oan, Bld, HQb .

And another very easy teaser - what is the easiest letter to create?

I hope you have enjoyed! OOPS almost forgot to tell you that I am a brand new blogger inspired by the team at "Its a Creative World" to start my own blog.

And the Winner is............ Katie Squirrel!!!

If you could contact us at acreativeworld@hotmail.co.uk then we can forward your address to Scrapbook Central for your yummy prize! Well done and thankyou for visiting!

Sunday, June 10, 2007

CHA Summer 07

Don’t we all just love those new products coming out?!! I know I certainly do. The Craft & Hobby Association Summer Convention and Trade Show offers the season’s largest selection of crafts and hobbies and takes place July 20-22nd this year.

We all have enough stash to fill a supermarket but we have to have more right? Papers and embellishments we already have get put to the side while we max out our credit cards in a million and one stores.

So, to wet your appetites, here are just a few things that should be landing on our shores in the next few of months. This is a very small amount so check back for loads more sneak peaks! Oh and don’t forget, if you leave a comment you’ll be entered into the draw to win a fabby prize from Scrapbook Central! Also they have very kindly supplied us with this code for a fabulous 15% off in their wonderful shop GEYJE50.

(Some of the pictures are a little small but i'll endeavour to get better ones for you :) )

Ok so starting with the fabulous Cherryarte. So bright and colourful, perfect for all those summer photographs! Rusty Pickle Mayflower Magistical Memories Prima Quickutz (released before CHA) Basic Grey(released before CHA)