Saturday, October 06, 2007

Christmas Planners

Christmas is less than three months away so we are starting our Christmas posts this month to hopefully have you all organised and ready for Christmas 2007. I started to use my first planner for Christmas 2 years ago, just a covered notebook with lists in, this year I have totally upgraded to an A4 binder with printouts from An Organised Christmas there are loads of different ones to pick and choose from, you just tailor it to your needs. I am also using the Holiday Grand Plan for cleaning Holiday Grand Plan Lists again I have tailored it to fit my home and family. I haven’t got a picture of mine to show you as (the shame of it) I haven’t decorated my binder, but here are some links to some gorgeous ones Holiday Notebook Tours, I found this blog last year while blog hopping, this lady, Kristin, has a wonderful notebook here Artfullyinking Blog and this one I found on Twopeasinabucket . Caz has also done a gorgeous notebook this year, and has decorated it beautifully.
I have also added a Birthday calendar and gift box list to the back of mine as I buy things all year round for Christmas and Birthdays so need to know what is in the box at any time, it does make life that little bit easier. I hope I have inspired you to start a Christmas planner, even if its for next year, have fun and don’t forget to let us have links to any planners you have done Trish xxx

Friday, October 05, 2007

Shiva Batik ATCs

Shiva paint sticks are beautiful, and they dry quickly. This is a quick and easy project that anyone can do.
Materials - Shiva paint sticks, cardstock, black paint, UTEE, melting pot & tools, paints
Step 1: Take skin off of shiva paint sticks. (Peel off the top layer.) Colour and doodle on card (colour of your choice.)
Step 2: Cover in black paint, as if you were doing crayon batik, and then wipe off excess paint.
Step 3: Add colour back in with more paint sticks and paints. Step 4: Cut into ATCs. This is the ATC I made for our team post on 1st October. I painted the pink ribbon and then placed the ATC face down (paint still wet) into the melting pot with hot UTEE. Here are two other ATCs after adding UTEE.

xxx

Joy

Thursday, October 04, 2007

Birthday Girl Card!

Hello Everybody! Joanne here! In honour of this being our Breast Cancer Awareness Month I thought I'd do a card that was quite pink and girly! I also wanted to have a go with some new Jill Penney/Daniel Torrente stamps I have just bought! Here's what I came up with:
And here's how you go about making it. The ingredients I used were a premade fuschia pink card, two sheets of BG Lollipop Shoppe and Lollipop Shoppe letter stickers. The chipboard star was American Crafts and a few rhinestones.
Step One

Begin by stamping your image and colouring her in.

Step Two

Cut a piece of patterned paper slightly smaller than the front of the card, ink around the edges and stick to the card. Add the stamped image to the left hand side.

Step Three

Cut a free hand heart out of the pink paper and ink around the edges. Type the word "Birthday" onto a piece of white card and ink that too.

Step Four

Arrange on card as shown, attach letter stickers, chipboard heart and bling for a bit of sparkle!

Hope you enjoy making this card! Have a great day and I'll see you soon! Joanne xx

Wednesday, October 03, 2007

Get ready to use that patterned paper

We at It's a creative world are so pleased to have a very special guest designer join us today.
A huge fanfare please for the uber-talented Paula Sealey. Paula has a fantastic eye for colour and her ability to put patterned papers together is amazing. So, without further adoo I shall hand you over to Paula.
*Hello, and thanks to the ladies at Creative World for asking me to be a guest here.
I have been scrapbooking for around 4 years now, and love the way I can express myself on a page using paper and embellishments. I adore patterned paper, and have managed to amass quite a large collection of it during my scrapping years! Sadly for my bank balance, there is hardly a sheet available that I don't like! I love mixing up different patterns and colours on my layouts, so they tend to be quite bright and vibrant.*
I hope you enjoy them!
Thank you so much for coming to play Paula. Fabulous layouts as always.
Todays post has been sponsored by Jaq at A string of beads. Jaq has donated to the ever growing prize pot for our *Scrap your bosoms* challenge.
Jaq's aunt set up the Crazy hats breast cancer appeal and has raised an amazing £450,000 so far. Some of the *old timers* on UKS may recall colouring in some stamped images to help.
Please have a dig around the back of your sofa or the bottom of your handbag and donate to our Just giving site. It is a fabulous cause and every bit helps. Also, you will be entered into our lucky dipper and could win a fabulous prize.
Toodle pip

Tuesday, October 02, 2007

Tipsy raisins for Christmas...

Hi from Di.
TodayI bring you an easy peasy idea for Christmas. These are DELICIOUS! (and I do not touch brandy normally.) You can make them for home or for gifts and believe me with ICE CREAM they are delish!!!
Lets start with what you will need:
750 gm seedless raisins
1 litre of inexpensive brandy
2 jars ( I used empty coffee jars)
some fabric and ribbon for decoration

Day 1 Put the raisins in your jars and top up with brandy as shown Day 2: The raisins will have begun to "sup" up the brandy so mix up the raisins with a spoon and top up to cover with the brandy.

Day 3: The raisins are still "supping" up the brandy so again, mix up the raisins with a spoon and top up to cover the raisins with the brandy.
This is how much brandy you should have left. Now just leave then in a nice cool place to FERMENT LOL.
OK you cannot leave them too long they will last FOREVER.
But eventually decorate and give them away (boo hoo) or use them youself!!! I dipped two circles of cream fabric into a bowl of hot coffee, rinsed the fabric, let it dry then made a lid and tied with ribbon.
I decided to make just two gifts but you could easily decant the raisins into smaller jars and have about 4 or 6 gifts!!!
Eat them out the jar, pour them on ice cream, or serve with Xmas pudding. They will warm the cockles of your heart.
PS. Don't forget to to visit our Just Giving page where you can make make a donation to Breakthrough Breast Cancer.
Woo Hoo as of this morning you have donated 100 Pounds!!! Great stuff Folks and THANK YOU!!!
Love from Di and thanks for visiting!!!

Monday, October 01, 2007

Breast Cancer Awareness Month - the boobs are out!!

Hello everyone, and welcome to another month here at It's A Creative World. breakthrough logo October 2007 is breast cancer awareness month in the UK, and with that in mind, the team at It's A Creative World have been busy getting creative with their boobs! We wanted to do our bit to raise the profile of breast cancer awareness month, and, in addition to our creative efforts, we have set up a Just Giving page where our readers can make a donation to Breakthrough Breast Cancer, one of the UK's leading breast cancer charities. We've set our target at £310 - that's £10 every day throughout October - if we could exceed that amount we'd be absolutely delighted. The donation page will remain active for 3 months until the end of December, and you can donate at any time up until then. Anyone who donates online between October 1st and October 31st will be eligible to win a prize in our draw, which will take place at the beginning of November, to give as many people as possible the chance to donate in October. We already have some fantastic prizes on offer, including a pink scrapbook album, a pink bracelet, an A4 sheet of Zettiology stamps, a £10 M&S voucher, and a £10 NEXT voucher. Further prize details will full details of donors will be added during October. All of us know someone who, at some time or other, has been affected by breast cancer. Breast awareness means knowing what your breasts look and feel like normally, so you can be aware of any changes and check them out with your doctor as soon as possible. If cancer is diagnosed, prompt treatment offers the best chance of a successful outcome. The message from Breakthrough is this: show your breasts some TLC - Touch, Look, Check. touch look check Before I go any further, a little announcement - we are very proud to welcome yet another FAB lady to the It's a Creative World team today! The fabulous Charlotte!! This lady does the most beautiful monochromatic pages and her use of loads of photos on one LO is just inspiring! Of course having the cutest little boy as the subject for her LOs is a bonus. Keep an eye on this lady cause she just oozes inspiration! So, on to the main event - the Creative World girls get their boobs out!! We allowed ourselves a completely free rein with our different interpretations of this challenge - I suggested that everyone should scrap their boobs, and the girls have risen admirably to this. Without further delay, I am delighted to present a feast of bosom!!
Andrea
Andrea
A beautiful tag in Andrea's instantly recognisable style. Angela
Angela
Angela's innovative and inspirational fabric journal. Caz
Caz-1
A vibrant and evocative layout from Caz, with some of the finer detail shown here:
Caz-2
Charlotte
Charlotte
A gorgeously pink and girly layout from Charlotte. Diana
Diana
Our very own Calendar Girl, looking very much at home! Joanna
Joanna
Lovin' her boobs, and lovin' life!! Joy
Joy
Yet more gorgeousness from our Queen of all things altered, and a beautiful ATC. Maria
Maria
A very sweet and simple ATC, taking its place amongst Maria's Momiji collection! Trish
Trish
Very pinky, very perky, Trish's striking layout.
And so, loyal readers and new friends, we throw down the gauntlet to you all, and ask you to make October the month that you SCRAP YOUR BOOBS!!! If you're feeling brave enough, email a photo of your interpretation of our challenge to us at: acreativeworld@hotmail.co.uk, and we will add any photos submitted to our flickr slideshow. As an added incentive, anyone who submits a photo of their project will have their name entered into a draw for a fabulous prize, this gorgeous selection of pink scrapping loveliness put together by our very own Andrea. Andrea's-prize We also hope to be able to offer a few spot prizes throughout October, so please keep checking back, and please help us raise some money for an extremely worthwhile cause. If you have anything you'd like to offer for our prize draw, please email us at acreativeworld@hotmail.co.uk - we'd love to hear from you. bcam xxx THANK YOU xxx

Sunday, September 30, 2007

Hand Sewn Fabric Book.

Hi Everyone! It’s Angela here and this is my first post as part of the Design Team! Today I am going to show you a 
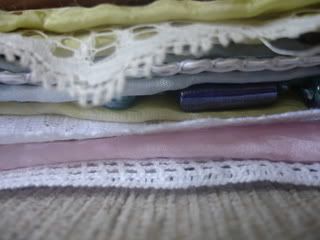
fabric book that I have been working on for the last month. As I have been trying to improve my sewing skills and experimenting a lot, I thought a fabric book would be a good way of storing my mixed media experiments that were just sitting around! I was inspired by a fabric book that Beryl Taylor shows in her book “Mixed Media Explorations”. For this project I used: Habotai 8 medium silk, Various dylon Dyes, Felt, Pelmet Vilene, Embroidery thread in different colours, Mixture of beads, Tiny Square mirrors, Wire, Tyvek, Acrylic Paints, Shrink Plastic, Stazon Ink, Sequin waste, Sea glass, UTEE, Various types of Lace, Metal Sheet, Clingfilm. First I dyed all the silk using Dylon dyes, in blue, green and pink. Then I cut them to size, and sewed them to felt to use as a support, while I sewed. Then I decorated each page separately.
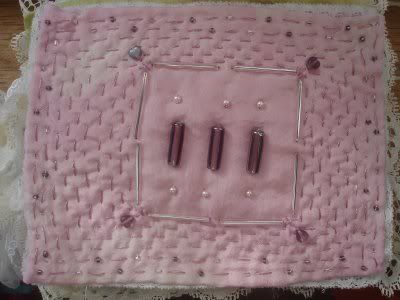
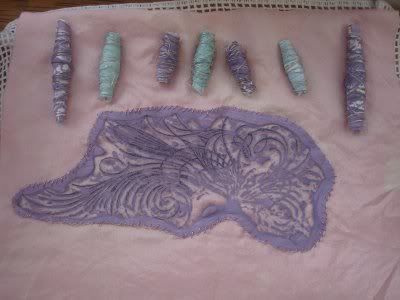
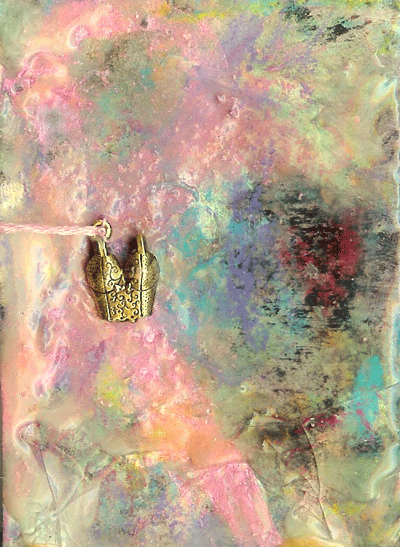
 Page 1: Sewed beads in the pattern as shown and then added some running stitch using the pink glittery embroidery thread, incorporating random seed beads.. 
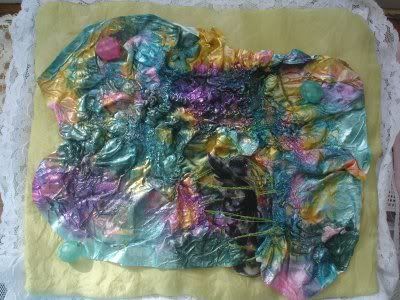
Page 2: This was a couple of experiments that I had tried using tyvek. I painted the tyvek with purple/pink acrylic paints and while still wet dropped in some embossing powder. Once this had dried, I sewed it, using random running stitch, to another piece of silk which had been dyed a darker shade of pink. Then heated it and the Tyvek shrinks and bubbles, pulling the fabric up with it. This was sewed onto the main fabric page. I added two metal wings to this. I also tried some Tyvek beads – using some more painted tyvek, cut this into an elongated triangle and wrap around a skewer, then wrap some wire around to hold it in place. Heat this using a heat gun. The tyvek will melt and stick together, leaving some interesting patterns. Don’t heat too much or it will stick to the skewer! These were attached to the page and then I did some random small stitches. 
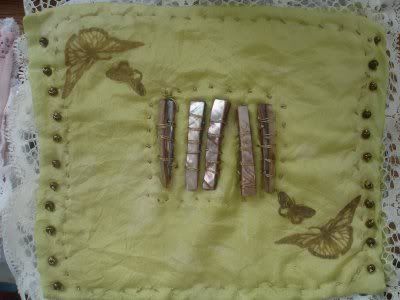
Page 3: I stamped a butterfly stamp onto the fabric, attached some long beads that came from a bracelet to the centre and attached some bronze seed beads to the edge. 
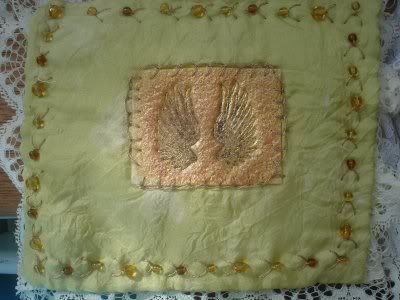
Page 4: I took a piece of felt, covered with versamark and sprinkled embossing powder onto it, I heated this and then applied another layer of embossing powder and while this was still hot, stamped a wings stamp into it. Sewed this onto the page and then added some amber beads to the edges. 
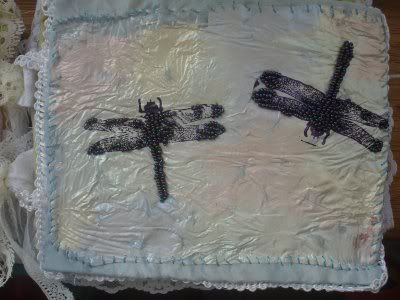
Page 5: This was made using the leftover cling film from an experiment, it was covered in acrylic interference paints. Once this was dry, I stamped 2 dragonfly stamps using purple Stazon and left this to dry. I then embellished this with some seed beads, and sewed it onto the fabric.
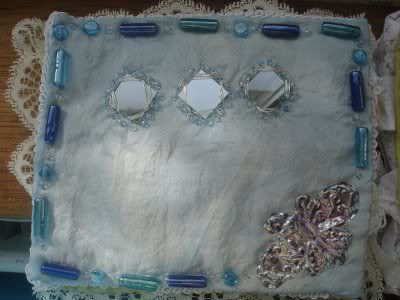
 Page 6: I stamped a butterfly image onto metal sheet and drew over it with an embossing tool, then turned it over and highlighted areas with some stazon ink. I punched some holes into this and then sewed it on. I wrapped wire around 3 little square mirrors and then attached them too. A variety of beads was used to edge the page. Page7: I sewed a piece of sequin waste to the fabric, and then attached a piece of seaglass which had been stamped on with a bee stamp and then covered in hot UTEE. 
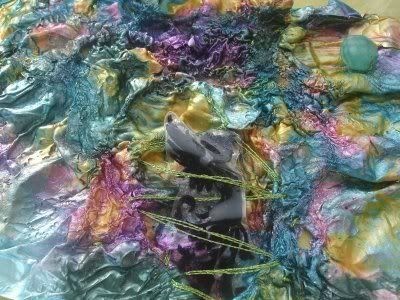
Page 8: Another piece of painted tyvek was used here, this was a thinner type and has a different texture to it. I sewed this in, then stamped an image of a nymph onto some shrink plastic and heated this. I then attached her using Glossy accents. Further embellished with beads. Page 9: More Tyvek beads used here, plus a swirly stamp experiment, again with painted Tyvek. Using a rubber stamp with the wood side down, place the tyvek on top and then place a piece of non-stick paper on top of this. Then using an iron, rub over the top of the stamp, just for a few seconds. When you lift off the paper, the image of the stamp is etched into the tyvek. 
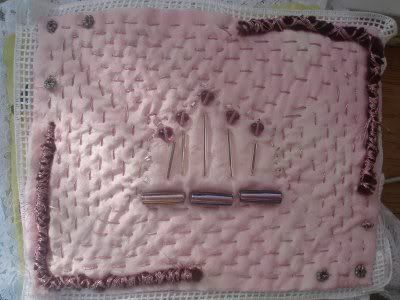
Page 10: Similar to the front page, with embellished pipe cleaners added , here I have wrapped pretty threads/fibres around pipe cleaners. The whole thing was sewn together with some pelmet vilene and lace between the pages to help support it more and to make the edges look pretty. Thanks for looking, I hope that I have given you some ideas for experiments of your own! ~angela~ ************************** Don't forget that this weekend, we have 6 Bella stamps to give away (hitchedabellafella, gardenbella, winobella, huggybellas, puppybella and emmybella). If you would like to be included in our prize draw to win these lovely Bella stamps from Papercrafts then please leave a comment in yesterday's message box with a way of contacting you.  See the post below for more details!