Saturday, October 20, 2007

Delightful terracotta candle pots

Hey there everyone! A big HI to you all today from Caz!
Today I am bringing you a very quick easy project that has no limits :) but in the spirit of Chistmas.
I found these beautiful church candles at John Lewis for £2 each! Yes that's right £2, and that was for the big ones, the smaller size were only £1 each (Wish I had bought more!). But my problem was I didn't have candle holders for them! That was until I stumbled across these cheap but very cute terracotta pots at my local garden centre and I just knew they would work! All I did was give the pots and wipe down to get rid of any water marks and cob webs (!) and tied some raffia around the rim to give them a country look.
The pots cost 39p and 59p for the larger ones!!!!
It was that easy and they look so pretty!
Now obviously we like to be able to adapt our projects to use for lots of different occasions, so some other ideas:
How about painting the pots orange and having them out in the garden for halloween.
How about using them as a centre piece when you have a fancy dinner party, a bit of black velvet ribbon around the rim would really snazzy them up!
Or you could paint them loads of different bright colours and have them on your outside table when you have a bbq.
And finally give them as a gift, if you buy the teeny weeny pots you could give 3 with a bag of tea lights to someone who enjoys having candles around the house. The teeny pots cost about 29p each!
I hope todays post has inspired you to add a little light into your life.
Caz xxx

And Hi from Di the MDD (Mad Dear Mother) of Caz. I have a little challenge for you today!!!

For every 1 pound that you donate to IACW Just Giving page I will donate 1 pound. This challenge is open until Sunday midnight 21st October!!! So come on girls just 1 pound from each of you! And why would I do this? Because cancer took my mum. Here she is....

Because of her I have a mother,I am a daughter, and I am blessed.

Love from Di

Friday, October 19, 2007

Beeswax Canvas

Hi Everyone! It’s Angela here again, with an altered art project. Today I want to show you a canvas that I made using beeswax, stamps, crayons and Tim Holtz distress inks. 
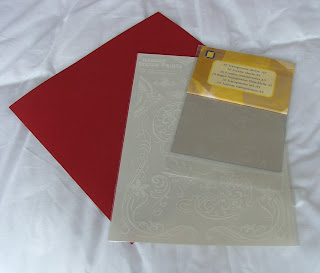
To start I took a blank canvas board and rubbed various distress inks over it. I then took a piece of cut and dry foam, damped it with some water and rubbed this over the inks to blend them together. I then stamped a large Stamper’s Anonymous Vogue stamp onto white tissue paper. I tore around this roughly. For the beeswax I used a melting pot and some beeswax pellets. I brushed the whole canvas with beeswax and then adhered the tissue paper, and then covered this with more beeswax. Be careful when using beeswax as it is very hot. Once it is applied to the canvas it will cool and harden quite quickly, so you will need to know where you want to put each embellishment before applying the wax. The wax can be melted again on the canvas using a heat gun if you need to. I then stamped some french postmarks onto tissue paper and adhered them in the same manner, along with a strip of scrapbook paper (measuring tape). The handbag and shoe was also stamped onto tissue. I then melted a red crayola crayon in the meltpot, and used a brush to put it on the edge of the canvas, and heated this with the heat gun to help it blend in a bit better with the rest of the content. The manequin was from a collage sheet, again it was adhered using beeswax, and the various embellishments were set into warm wax. Finally I did a packing tape transfer from a dictionary – definition of “fashion”. Packing Tape Transfers are the most simple way of doing an image transfer. Simply use clear tape or contact film/clear sticky-backed plastic if it is a large image, put this over the image or text you want to transfer, rub with a bone folder to make sure that the tape is well stuck down. Then wet the paper and begin to rub the paper off until you can see the image/text. You can then stick it down on your prepared surface. Remember not to place a beeswax collage near a heat source, or the elements may fall off! Hope this inspires you to try something different! ~angela~ ****************** We now have the winner from Yesterday's Heat Gun giveaway, which was kindly donated by Forgetmenot Papercrafts. SuzyB :) Can you contact us please so that we can get your lovely pink heat gun sent off to you :) Congratulations!!! 

Wednesday, October 17, 2007

Acetate Cards!

Hello everybody! Joanne here again. As you may have seen acetate cards have become very trendy recently and I for one am no exception to this trend. I love making this type of card as they look so unusual and effective. I've made one for this weeks' card. Very straightforward and quite quick to make. Here goes!
The basic ingredients for this card are an A5 sheet of acetate (I got mine from a pack used for glass painting), cardstock and rub ons (I used Hambly). The bits of embellishment I used were a piece of lace and ric-rac, safety pin, small label and small rhinestones.
Step 1
Fold your acetate in half to form your card. Cut two identical hearts from the red cardstock.
Step 2
Decide where you are going to place your rub ons and heart on the outside. Stick one heart inside the card exactly where the one on the outside will be (this is so you can write your message on it!).
Step 3
Decorate your heart for the outside if desired. I tied round some ric-rac and lace and added a safety pin and small label. Attach to the front of your card directly over the heart which is on the inside.
Step 4
Apply rub on to the front of your card and embellish with rhinestones if desired. I hope you enjoy making this card as much as I did. Look out for more acetate cards in the future!
TFL! Joanne x *************************************************** As part of our Breast Cancer awareness month,  today we are giving away a beautiful Pink Heat gun, which has been very kindly donated to us by Stephanie at Forgetmenot Papercrafts in Belfast.   All you need to do is either:  donate some money to our Just Giving Page, Scrap your Bosoms or leave a comment.   Remember if you do all 3, you'll get 3 chances at the prize!!! Goodluck!

Nude words....inside and out!

Ooh doesn't that title sound a bit naughty {lol}
Today we are looking at decorating wooden letters and I want to extend a huge IACW welcome to the lovely SCRAPDOLLY who is sharing her stunning project with us today.
Karen has decorated the word TRAVEL beautifully using themed paper and embellishments.
And a little detail...
My project is a little different...
I have used the Creative Imaginations bare elements word CREATE and have decided to start off decorating the NEGATIVE or OUTSIDE part first. (the insides are still waiting for their turn!!}
Firstly I painted the whole thing blue, including the inside bits for the R and A.
Once dry I used a sanding block to give it a shabby worn out look.
A few bits of ribbon and a clear jewel were the only decoration I wanted.
For the backing I used Cosmo Cricket, Dutch Girl: Audrey paper attached with modge podge.
And a little detail...
A huge thanks to the lovely Scrapdolly for sharing her work with IACW readers
and as always...
haPPy creATing
Caz
xx

Tuesday, October 16, 2007

Stitch mania

Good morning to you all!! Caz here, with another LO class :) And we are so honoured to have the lovely ~Angie~ as a guest DT member today!!

Stitching on layouts, whether by machine or hand, seems to come into fashion so often and it is one of the most effective ways to add dimension to a LO. In the layout below Angie has even added some hand stitched doodling which looks great and of course you can make up your own designs. She has also stitched around each square of patterned paper which gives the LO a quilt effect and around the photograph which frames Emily beautifully :)

~Angie~ says.....
I have been scrapbooking for nearly 2 years now. My children Emily and Adam are the main things that inspire me to scrap....I love to capture moments in my photos and on my layouts that otherwise may get forgotten. To capture little details of everyday life, to keep to look back on in the years to come. They love it when Mummy has made yet another page about them- I'm not so sure they'll see it the same way when as teenagers they look back at layouts with them having a strop! Currently I'm going through quite an experimental stage with my scrapping. I don't think I really have a style as some scrappers seem to do, but there are various elements and techniques that I use over and over again, and nearly all my layouts have some if not all of these included. What do I like? Chipboard alphabets, inked edges, buttons, ribbons, stitching- mainly by machine (as I'm generally too lazy to hand sew!! lol) I had great fun creating these two layouts, I find stitching adds great extra depth and texture.
Machine sewing around the edges of your cardstock also frames the LO, and I just love how Angie has stitched around each felt flower.
Our own lovely Joy has also contributed to this project with a totally different style of stitching. Joys stitches are randomly placed and hand done, she has also used fabric, ribbon and bits of a real pattern to match the theme of her 'handmade with Love' LO.
Aren't these just the MOST beautiful photographs!!
A massive thanks to both Angie and Joy for sharing their stunning work with IACW today.
And remember we love to see our readers layouts so please leave us a link to your gallery/blog so we can drool, lol.
haPPy creATing
Caz
xx

Monday, October 15, 2007

Crochet update!!

It's mid month Monday and that means I get to tell you how far I am with blanket number 2!!
For new readers to IACW, you can catch up with the CROCHET STORY HERE :)
With only 10 weeks left till Christmas I am just over half way through the 224 squares, which means I need to average 16 squares a week, to leave me enough time to put the blanket together, get all the ends trimmed and washed, dried and beautifully wrapped!!
EASY PEASY!! {lol}
Di {my DMM (dear mad mum)} has taken up the crochet challenge and this is seriously an awesome blanket she's made. It's very different to the girls blankets, as I am using one colour to surround each square, put it together and crochet around the whole blanket.
BUT it just goes to show how totally flexible and imaginative you can be with crochet.

Di says..............10 colours, 224 DIFFERENT {ie 224 unique} squares. It took me 2 weeks to make the squares then another week to crochet them together and crochet round the edges.

If you are an avid crochet'er we would love to see your work, so please pop a link in the comments :)

The lovely CHRIS is supporting out breast cancer fund raising efforts with another CHALLENGE!!! Chris says:

"I am asking you to take part in my little challenge to be included in the draw to win lovely blog candy and I will be making a £10 donation to the Just Giving page for the winner also... who will then be eligible to win some of the goodies IACW are offering too :D"

Please visit CHRIS to see the GREAT challenge she has put together!!!

haPPy creATing!! Caz xx

Sunday, October 14, 2007

Christmas bunting

Very warm Sunday greetings to you all from Caz and Angela!!
Today we are bring you a little more Christmas inspiration to get those creative juices flowing :)
Buntings have been around for years, but i've noticed this year that they seem to have been a very popular decoration!
So we are bringing buntings indoors and using up those bits of Christmas fabric to make great decorations for the home :)
Caz
For my bunting I have cut triangle shapes from fat quarters using pinking shears, this meant I didn't have to stitch around each one {lol}.
I folded the tops of each triangle over a length of twine and hand stitched using thick green thread. I didn't want my triangles moving around on the twine so I popped a couple of stitches through the top to hold them in place.
I cut green felt in the shape of holly and stiched it to a couple of the triangles using red buttons and ribbons for the berries.
And on a couple more I again cut green felt into strips {3 different lengths} and attached in the shape of a Christmas tree. Brown velvet ribbon did the trick for the trunk and these gorgeous little yellow star buttons were perfect for the tree tops!
Angela
I have made some Christmas bunting that I would like to share with you.
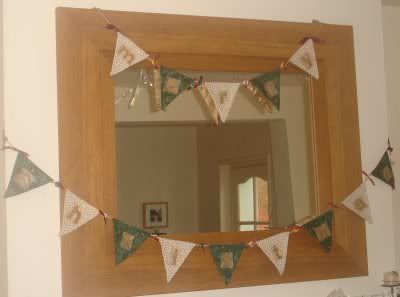
I made it from 3 different fabrics, 2 Christmas decorative fabrics and gold satin to finish off the back. I cut the fabrics into triangles, using a template I had cut out of paper. I also cut out some Pelmet Vilene triangles to use as a support for the bunting. I sewed 14 triangles, 7 in white and 7 in green to the Pelmet Vilene and then I covered a large piece of cream felt with Versamark ink, and sprinkled gold embossing powder on it. I then heated this with a heat gun and let the embossing powder melt. I repeated this process twice. This left a beautiful gold felt :)
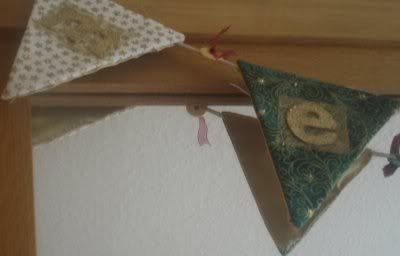
I then drew around some Heidi Swapp Ghost Letters onto the embossed felt to read "Merry Christmas" and cut these out. I then cut some gold fibre paper out in squares the same size as the letters and sewed the letters to the bunting.
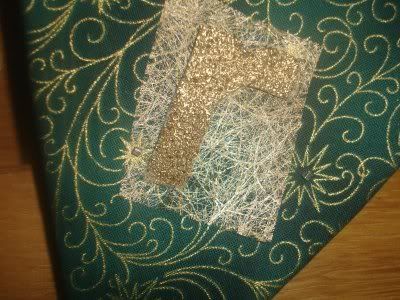
I used gold cord to join the flags together and sewed these in place, attaching gold satin fabric to the back of the flags. Finally, I embossed some cream buttons with matching embossing powder and attached these to the cord using ribbon.
Thanks for visiting and don't forget to SCRAP YOUR BOOBIES for a great cause! All entries received at acreativeworld@hotmail.co.uk will be entered into a prize draw at the end of October. The lucky winner will receive a gorgeous collection of PINK embellishments.
There are also spot prizes through the month for anyone who donates through our JUST GIVING page!! Don't forget every penny counts.
haPPy creATing
Caz and Angela
xx