Saturday, September 29, 2007

An Extra Special Prize Draw

********Prize Draw Winners********
Smile - hitchedabellafella & puppybella
Tammy James - winobella & gardenbella
Jo(UpseyDaisy) - huggybellas & emmybella
Please email us at acreativeworld@hotmail.co.uk with your address so we can post your Bella stamps to you.
*********
Today we have a real treat for readers of It's A Creative World. The very generous Papercrafts shop in Elgin, Scotland have kindly donated a selection of Bella rubber stamps to give away as a prize draw for anyone who leaves a comment on this post today or tomorrow.
Bella stamps have been taking the cardmaking community in America by storm and they've recently landed on our shores, courtesy of Papercrafts and are having the same effect on British cardmakers. Perfect for girly/teenage/female cards, gifts, altered items etc. the 'Bellas' and of course her 'fella' are depicted in various occupations and with cakes, babies, flowers, presents - if you can think of an occasion when you would need a card there will be a Bella stamp just perfect for the job. Contact Papercrafts vis email at kmaciver@aol.com to learn more about the Bella stamps.
Always up for any kind of a challenge some of the girls at IACW have been playing with the Bella stamps and this is what they have come up with.
******

Pretty in Pink Bella ATC - Joy

I coloured Bella with pink coloured pencils, trimmed the image, and glued it to pink blonde moments papers. I inked the ATC with black stazon ink. I then repeatedly dipped the ATC in UTEE, adding pink embossing powder and beadazzles.

**********

Happy Birthday, For the Bride and Hi cards by Caz

**********
We have 6 Bella stamps to give away (hitchedabellafella, gardenbella, winobella, huggybellas, puppybella and emmybella). If you would like to be included in our prize draw to win these lovely Bella stamps from Papercrafts then please leave a comment in the message box with a way of contacting you - blog link, email address, UKS forum user name etc. Unfortunately if you don't leave a way of contacting you we can't include you in our draw.
Of course, if you aren't lucky enough to win some of these beauties you could always email Papercrafts (kmaciver@aol.com) and invest in a 2 or 3 .............. or 6 or 7 ........ or 9 or 10!!!!!
We really hope you are inspired by todays post and would love to see your creations.

Friday, September 28, 2007

Mini Book Challenge

Today we are challenging you to make a mini book. It could be in any style for any occasion, it just needs to be some sort of book.
I don't know about you, but sometimes I am put off from making a mini book as I 'think' it will be very time and labour intensive. But of course it doesn't have to be.
A few of the girls at IACW have been playing and have come up with a few ideas for mini books that are relatively quick and simple.
The first is Andrea's book - a gift for her friend. It was made to keep a record of her little girls' birthdays, from her 1st to her 18th so each page has a numbered tab with the age on and in 18 years when Ela is all grown up and beginning life as an adult Donna can look back at a lifetime of birthday memories.
Andrea's book started out life as a 'little pink pig' wire bound journal. She removed the wires, covered the front and back with the candy striped paper, covered the front and back inside covers with a plain pink paper, cut a strip of pink paper and attached to the front and added a chipboard flower and letter.

Andrea made the tabs by cutting small rectangles of patterned paper from the offcuts used to cover the book, folding in half and attaching to the pages with an office stapler, she used number stamps to label each tab. Andrea used different patterns of pink ribbons and teeny tiny paper tags to decorate the wire binding and her book was finished in a couple of hours.

********

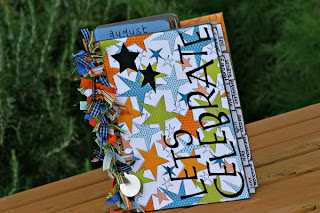
Caz also took up the mini book challenge and she has made a fantastic birthday book to record all the important birthdays in her family month by month. Just like Andrea, Caz has used patterned paper to cover the front and back of her book and used die cut letters to spell out the title.

Caz added tabs to the top and side of each page to distinguish each of the months so she can easily keep up to date with upcoming birthdays.

To decorate and disguise the wire binding Caz used a variety of different ribbons and tied small charms that dangle down the spine.

********

Trish was inspired by the arrival of Snuggles, a new family pet and made a mini book to record it's arrival. She used Basic Grey papers and various tags, rub ons and embellishments to create this sweet little book.

********

We hope that you've been inspired by our mini-books and we want to see your creations so please leave a link back to your gallery in the message box and remember to check back on Saturday for details of our exciting prize draw.

Thursday, September 27, 2007

Baby Card

Hello, I've made a baby boy card today to share with you but it could easily be changed to a baby girl card by using different coloured papers.
The instructions are in three stages - the round topper, 'baby' letters and the card assembly.
The round topper:
Step 1:
Stamp a suitable baby image with black stazon onto white card.
Step 2:
Use a circle punch to punch the stamped image, turn the punch over so you can see where to cut the circle.
Step 3:
Use watercolour pencils to colour the image.

Step 4:

Ink around the edges of your stamped image with charcoal chalk ink and layer onto a slightly larger blue circle using foam pads to give dimension and chalk around the edges again.

Step 5:

Punch a scalloped circle from white card using a large punch, doodle and ink the edges

Step 6:

Glue the white circle onto a slightly larger blue circle and ink around the edges.

Step 7:

Mat the stamped image onto the scalloped circle using foam pads.

The 'baby' letters

Step 1:

Cut letters from blue cardstock using a die cutting machine, electronic cutting machine or with scissors.

Step 2:

Doodle around the edges with a fine black pen

Step 3:

Use a cuttlebug embossing folder to emboss the letters

Assembling the card:

Step 1:

Cover a square card blank with patterned paper and ink around the edges with charcoal chalk ink.

Step 2:

Glue a strip of white ric rac across your card.

Step 3:

Use foam pads to attach your topper over the strip of ric rac.

Step 4:

Glue the 'baby' letters under the topper.

I specifically chose patterned paper that looked like it had lots of strips of ribbon running across it and added the ric rac to give extra detail to the card.

(Patterned paper by Flair Designs, ric rac from Fenwicks, punches by Dovecraft and EK Success, rubber stamp by Studio G, font for 'baby' letters stovetop, Cuttlebug embossing folder)

You could easily make this into a girl card by substituting the blue paper for pink paper and if you aren't sure of the sex of the new baby try something that isn't the typical blue or pink.

Have fun and don't forget to check back on Saturday for details of our fabulous prize draw. Andrea xx

Wednesday, September 26, 2007

Clay Creations

This is a little project that is great to get your mojo going - and even something you can do with your kids.
Materials: Air dry clay
and (vary as you like) - angelina fibers, paints, stamps, other molds/icetrays/items to make impressions, heat gun, embossing powder, stylus/pin (for carving), glossy accents
For the beads, shape as desired. I used an embossing stylus to carve some designs into the clay.

I used a silicone ice tray to shape the heart, and I carved, "sweet," into the clay with the embossing stylus. For "friend," I used a Heidi Swapp stam to stamp directly into the clay, and I added Stewart Gill Byzantia chips (pressing them into the clay). For the star, I used another silicone ice cube tray to shape the clay, and I carved, "dream," into the clay.

For the shell, I pressed the clay onto a seashell, and gently lifted it off. For the moon stamp (tin can press), I stamped directly into the clay. I freeformed the small heart and wrapped it with heated angelina fibers (zapping it again with the heat gun).

Next, I added gold interference paint to the small heart.

At the same time, I stamped Stampers Anonymous wings into the clay, embossed them, and added angelina fibers. I zapped them with the heat gun immediately.

At this stage, I left all pieces to dry for several hours. I returned to work on them (not fully dry, but dry enough to add paint and other materials).

I painted the beads with lumiere paints and colour washes, finishing them with highlights from a krylon pen.

I added told interference paint and more gilding chips to the friend embellishment.
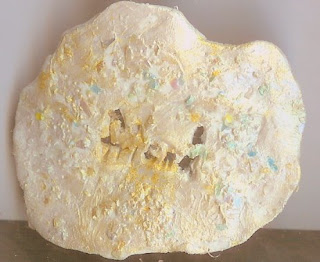
I used gold interference paint on the shell.

I painted the star with Stewart Gill alchemy paints. I added glossy accents to make it shine.

I used red lumiere paints and iridescent medium on the heart.

I painted a plastic box, added ribbons and beads, and then framed it.

Finally, for the moon, I made a shadow box from a 7gypsies tin. I spray painted the tin black and gold. I added the moon and angelina fibers (heated with a heat gun.) Next, I added previously made UTEE stars, and I glued on beads and coloured, shrunken plastic.

I hope this gives you some ideas for clay embellishments and projects.

xxx
Joy

Tuesday, September 25, 2007

Fabulous cards

We are so excited to have another guest visit us at It's a creative world. Today we have some fabulous cards created by the uber-talented Claire Hamer aka Ginger.
Ginger is regularly published and has made these cards to share with you. If you look carefully you can see who the lucky recipient of one of them is.
Ginger said *I sometimes struggle to use my "best" stash. You know the stuff that you really love but I challenged myself to see how many letters I could use out of these gorgeous spotty pink Bazzil letters*.
Well, the girlies here at It's a creative world are certainly pleased that you cracked open your best stash to share with us.
Thank you so much for taking the time to come and play Ginger.