skip to main |
skip to sidebar
Guest Designer time! Welcoming Jakey :)
Hi! Jakey here, and I’m very honoured to be invited by the Creative World team to share a li’l technique of mine with you today. I’ve been playing with transparency – well, who hasn’t, eh? And I’ve had some fun making and adapting my own ‘ghost lettering’ to add to cards, layouts and other projects. Transparent letters can be quite expensive to buy – but they’re so easy and economical to make! Great fun too, and they give you a fab opportunity to get your hands grubbied up with paint and inks… now what could be better?
So, to start with, you will need some supplies – but it’s almost certainly the sort of stuff you have in your stash already! You’ll need:
Inkjet transparency sheets
Assorted acrylic paints
A pen that will write on glossy surfaces – a slick writer or gelly roll.
Inks – chalk and/or alcohol
Any bits you want to add… beads, glitter, bling, buttons… whatever.
You’ll also need access to a PC or some lettering templates. I make mine in Microsoft Publisher, but you could use Word, or whichever DTP program you use normally. If using good old fashioned lettering templates, just place template over the acetate sheet and trace the letters! Cut out, and decorate – nothing could be easier. If you plan to make them with Publisher I have added some instructions here for you to follow. For the beginners amongst us, I have assumed no prior knowledge - so all you PC whizzkids, do not be offended please!
 Open publisher and choose blank page > word art (left hand side). Select highlighted box on top upper left, giving you an outline font.
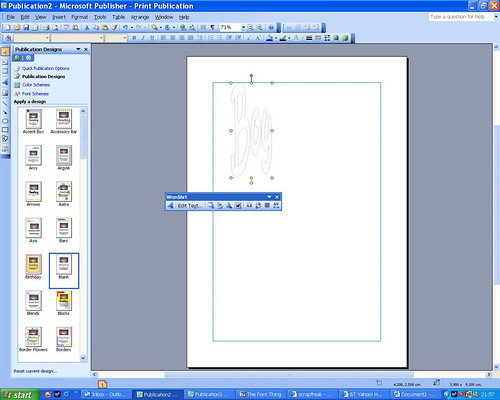 Type your title word. Select edit text and choose font >choose bold.
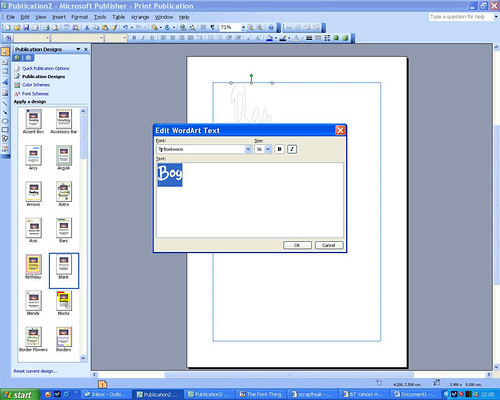 Click text box to select and stretch word to the size you require.
 In edit text choose format text > grey > at 1 point.
The reason you want grey is to avoid deep black outlines. You are going to cut these letters out and the grey outline is for guidance only. Cut just inside the lines, so your transparency letter is clear of any markings. (This, you may like to add back in later with a slick writer style pen for a freestyle look).
In edit text choose format text > grey > at 1 point.
The reason you want grey is to avoid deep black outlines. You are going to cut these letters out and the grey outline is for guidance only. Cut just inside the lines, so your transparency letter is clear of any markings. (This, you may like to add back in later with a slick writer style pen for a freestyle look).
 Print title word out at desired size. Cut out and you're ready to play!
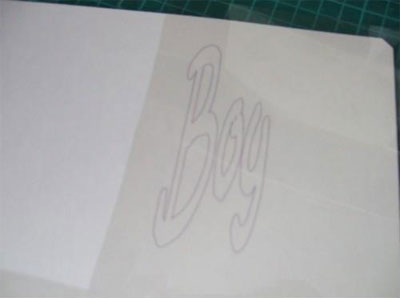 Do remember to set your printer to ‘mirror image’ or reverse printing and to print onto the rough side of the acetate. This way, you can flip it over once printed, and the good smooth side will be the side that shows on your project.
So - You now have your blank ‘ghost letters’, which you can grunge up, jazz up, colour up, doodle on – however your mood takes you!
Do remember to set your printer to ‘mirror image’ or reverse printing and to print onto the rough side of the acetate. This way, you can flip it over once printed, and the good smooth side will be the side that shows on your project.
So - You now have your blank ‘ghost letters’, which you can grunge up, jazz up, colour up, doodle on – however your mood takes you!
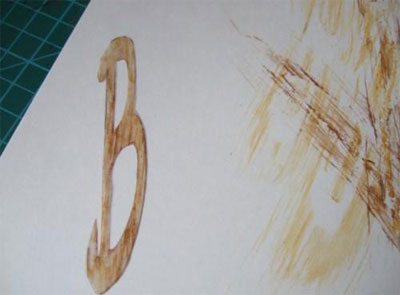 1. The letter has been cut out and dry brushed with acrylic paints.
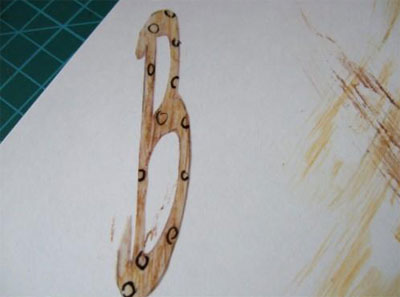 2. I’ve added some scribbled circles to the letter here.
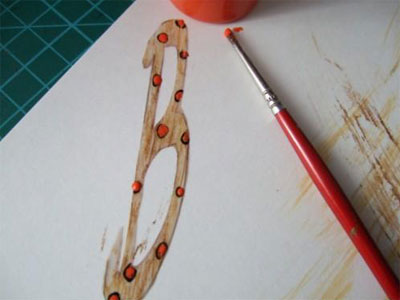 3. Next I blobbed paint onto the circles.
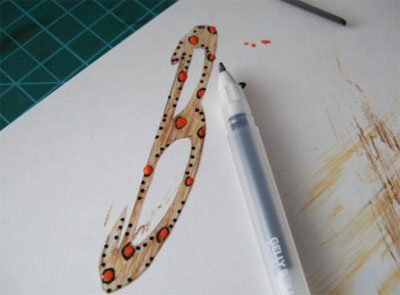 4. Then added some doodling detail – and I’m done! Took minutes!
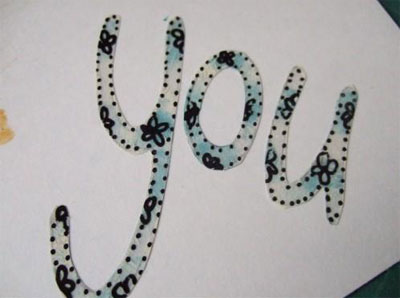
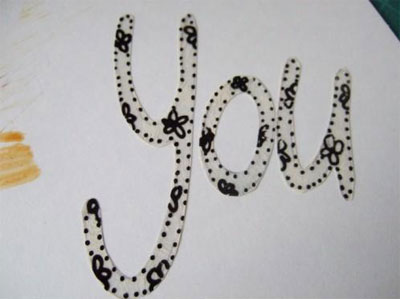 A different style. Flowers and dots!
 And again, but with a bit of chalk ink smudged on the back – who says you can’t do freestyle lettering? Lol!
Read on for some tips on having fun with these versatile letters – but why stop at lettering? Print out butterflies, birds, flowers, stars… anything you like! Paint them, doodle on them, add glitter, bling, alcohol inks…. your imagination is your only limit!
A few tips for enjoying these versatile letters/shapes!
The transparency will accept acrylic paint very well. Paint on the back (rough side) for more durability. Or paint on the front and scratch some paint off for a grungy look. You can completely cover the letters with paint or dry brush as I have here.
Use a slick writer to doodle outlines, circles, flowers, dots or stars… or whatever you want to go on them. Write on them, add glitter, buttons and beads…
Alter the colour with alcohols inks, or stamp over them using stazeon inks for a permanent finish. Why not paint first – then stamp over? You really can do so much with them – and can customise them easily to fit your project.
I’m sure you can think of lots more ways to use this technique.
Just remember to have fun whatever you do!
Happy Scrappin!
Jakey xx
A HUGE thanks to Jakey from the Creative World team - there's a little something on it's way to you in the post!! ;)
And again, but with a bit of chalk ink smudged on the back – who says you can’t do freestyle lettering? Lol!
Read on for some tips on having fun with these versatile letters – but why stop at lettering? Print out butterflies, birds, flowers, stars… anything you like! Paint them, doodle on them, add glitter, bling, alcohol inks…. your imagination is your only limit!
A few tips for enjoying these versatile letters/shapes!
The transparency will accept acrylic paint very well. Paint on the back (rough side) for more durability. Or paint on the front and scratch some paint off for a grungy look. You can completely cover the letters with paint or dry brush as I have here.
Use a slick writer to doodle outlines, circles, flowers, dots or stars… or whatever you want to go on them. Write on them, add glitter, buttons and beads…
Alter the colour with alcohols inks, or stamp over them using stazeon inks for a permanent finish. Why not paint first – then stamp over? You really can do so much with them – and can customise them easily to fit your project.
I’m sure you can think of lots more ways to use this technique.
Just remember to have fun whatever you do!
Happy Scrappin!
Jakey xx
A HUGE thanks to Jakey from the Creative World team - there's a little something on it's way to you in the post!! ;)

1 comment:
Great stuff I have always wanted to know how to do this! And so well explained thanks!
Post a Comment