Tuesday, August 28, 2007

Fabric Baby Wall Hanging

Hi!!! It's Angela here, Guest Designer. Thank you to all the girls for asking me to share with you today! :)

I've been experimenting with fabric recently, and trying to incorporate it in some of my mixed media projects, so I am going to share a wall hanging that I made which includes some mixed media elements.

As usual when you have a baby, you have lots of little things sitting around the house, that you want to keep to remember how tiny your little one was once upon a time. I wanted to make something that I could have on display, instead of hidden away in a box, and so I decided on this wall hanging.

Here are some of the materials I used to make this:

Fabric Dye (Blue),LooseWeave, Muslin,Golden Gel Medium,Photocopied Images,Wire 18 gauge, assortment of beads,Coloured threads, organza,Heidi Swapp Ghost, StarButtons,Bamboo cane, Ribbon

I dyed the silk with the blue fabric dye following the manufacturers instructions. Cut the felt to the required size for the wall hanging and then covered the felt with the blue silk. I then randomly stitched into this and added beads to the edges. This is quite time consuming, but easy to do in front of the telly!

I cut out 3 pieces of silk to make the tabs for the top, and mounted them on top of felt for stability, and attached them, placing a button on the 2 outside tabs.

For the embellishments, using Photoshop, I changed 2 images of DS to black and white, printed them off and then photocopied them. I also took a photo of DS's first baby gro and blanket, changed them to black and white in photoshop and used the stamp tool to make it into an outlined image. I then chose part of the image of his blanket and baby gro which had little characters on it, and printed those out. These were also photocopied.

Now to transfer them onto the muslin.

I covered the photocopied images with Golden Gel Medium (just over the image, careful not to get it on the back of the paper), and then added more Gel Medium to the Muslin. The images were then placed face down onto the muslin, burnished lightly on the back and left to dry overnight. I then took a bowl of water and immersed the muslin, so that the water seeps through the back of the paper that is attached.

Carefully rub the paper off - this can be quite time consuming. Leave the image to dry. You might find that once it is dry that there are still traces of the paper attached, simply wet this again and rub more. Once the image is dry you will see that the image is transparent, so you can use it whatever way around you prefer. I used it so that you were looking through the muslin at the image as it gave a softer appearance that suited the wallhanging.

I then embellished these with twisted wire and random beads.

I also encased one of DS's little socks between a layer of felt and some purple organza. I embellished this with random stitches in silver thread.

For the final embellishment, I cut up one of his bibs and used this to back a Heidi Swapp Ghost star, which also had purple organza behind it. I then embellished this with silver thread and more beads.

All of these were sewn in place and then a bamboo cane cut to size and put through the tabs at the top. Finally a ribbon attached to the bamboo cane to hang it from the wall.

Working with fabric really is a lot of fun, and it feels lovely to work with. I only used very simple stitches (which I learnt at school!) and did it all by hand, so you do not have to have any special equipment to work with - anyone can give it a go. Many of the techniques we use with paper crafting can be applied to fabric, painting, embossing powder, stamping... give it a go:)~Angela~

Monday, August 27, 2007

Scrap your Layouts

Hello again from Di, the mad darling mother of Caz this time coming to you from my home in Cape Town.

Do you hate to part with layouts and special stuff that you have created? I do and so I have created a story of my scrapbooking by scrapping some of my layouts. Its a neat way to give away originals of the originals if you see what I meen.

Start by taking photographs of your layouts and printing them. Then either buy or make an album ( I chose 8" by 8") and just scrap your layouts. You can use up the leftover cardstock, patterned paper, embellishments etc. AND create a great gift for family or friends.

(P.S. Please excuse the photos today, am still struggling to take photos of layouts. I will improve.)

My finished album is QUITE (very) FAT! so be careful:

First select the layouts you want to 'scrap' and ake your photographs.

Then scrap them using the leftover cardstock and PP etc. In this first example, I have recreated (well almost) the original layout:

And here, I have tried to carry the style of the original page onto the new page:

In this example I used dfferent 'button' PP for the new layout: And in this example again different but co-ordinating PP on the new layout: Here again I have almost recreated the original layout:
In this example, I just extended the 'happy in my skin' theme showing my 20s 30s 40s and 50s into my almost 60's. Finally in this example, I included the first card (yes the ORIGINAL lol) I ever made: I made this album for my DD Caz, so that she has a share of some of my very early scrap booking, and what scrapbooking means to me. Perhaps you could scrap your kiddies layouts as a gift from Grandma and Grandad?

Thats it for me from today except to remind you to get your kiddies crafting and enter our children's art competition. You only have a few more days.

Remember to "Use your Stash", thanks for visiting and love from Di

Sunday, August 26, 2007

Sketches

Hiya. Cath here this Sunday morning, I hope you're having a great weekend?!! So, sketches! Do you sometimes sit down to scrap and your mind goes blank and you totally don't know where to start? Do you have a few photographs lined up but aren't sure where to post them? Do you have trouble with multi photo layouts? I know I can answer yes to all these questions and that's where sketches can come in really, really handy. You aren't scraplifting an idea, you are simply using a template that has been produced to help you. So, here are just of a few of the many, many sketch sites out there. I hope you find lots of inspiration! Page Maps Sketches R Us Got Sketch? Pencil Lines Sketch Lover Sketch It! Scrap Maps Sketches by Suzy Scraproom Blueprints Little Book of Sketches 2 Mad Scrappers Becky Higgins

Saturday, August 25, 2007

Let's get our children creating

Hi, it's Maria here continuing with the campaign to get our children creating.
Firstly we have a rather fabulous masterpiece from Rebecca Amber Sealey. Rebecca is ten and the daughter of the incredibly talented Paula. I particularly love the crown and the feisty look in her eyes.
Our second masterpiece is from Calum a super cute 2 year old and the son of our very own Joy. Calum has used some old MM and Pooh heart stamps in his masterpiece.

Don't forget that you have until the 31st August to let us have your child's creations. Simply email them to us at acreativeworld@hotmail.co.uk.

Everyone who submits artwork will go into a draw to win a £20.00 voucher for the Early Learning Centre. If the winner is older they will receive a voucher for another store. Obviously, Calum won't be entered into the draw.

Friday, August 24, 2007

Back to school - cameras at the ready!

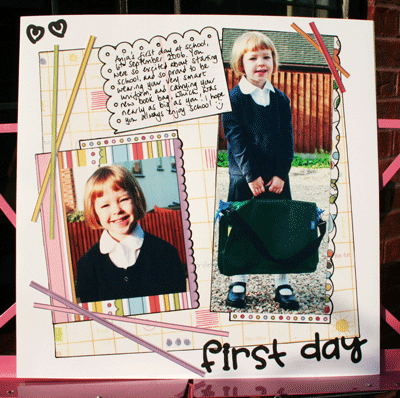
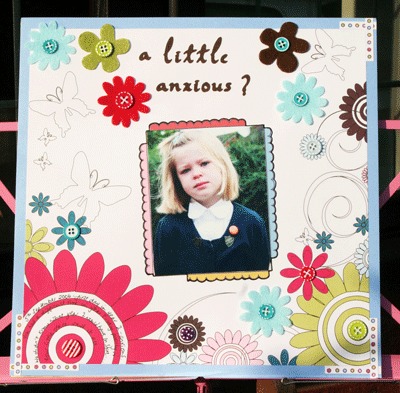
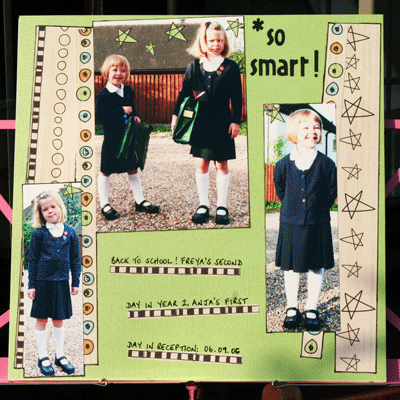
Hello :) It's Jo here, bringing you some 'back to school'-themed layouts, and urging you all to have your cameras at the ready when the children start the new term in September. I try and take photos throughout the school year, so that when I'm doing my teacher presents at the end of the summer term, I can include photos taken at different points during the year, and it never ceases to amaze me how much the children can change in the space of ten or so months. My younger daughter started school last September, and looked so little on her first day - her book bag was nearly half the size she was! first-day My elder daughter was joining year 2 last September, and her year 1 had been quite difficult for her, due to a period of ill health. I knew that she was anxious about going into year 2, and her face on this photograph told me all I needed to know about exactly how she was feeling. Thankfully, she connected with her fantastic year 2 teacher almost instantly, and had a brilliant year with her. I have journalled my feelings and her feelings about starting year 2 around the circles in the bottom left portion of the layout. I didn't want to do hidden journalling, but I also didn't want the journalling for this layout splashed across the page. a-little-anxious I absolutely LOVE seeing my girls in their new uniforms at the start of the new school year - they look so smart (for about a week!!!) and their shoes are pristine. I wanted to do a layout showing just how smart they look. so-smart With thanks to my lovely friend Debbie for letting me have a play with her Cricut to cut my titles for these layouts - much easier than cutting them by hand! More school-themed layouts on the way in September, when Trish will be celebrating and commemorating 'starting school' :)
Bye for now!

Thursday, August 23, 2007

A Funky Bella Card

Have you seen the stamps that are kicking up a storm in the USA and are rapidly getting a fan base over here in the UK - Bella Stamps. Gosh, I am totally hooked! I think this may be the first of many 'Bella Cards' on It's A Creative World.

Step 1
Use a gate fold cardblank or cardstock cut to size and scored to create sharp folds.
Step 2

Cover both sides with co-ordinating papers, ink edges with charcoal chalk ink.

Step 3

Adhere paperfrill to pink card, trim and ink edges to create a paper 'ribbon'.

Step 4

Attach to card, line up both sides so that they are even before gluing!

Step 5

Stamp 'Bella' using Staz-on ink and colour with watercolour pencils or paints, mat onto pink cardstock and ink the edges using charcoal chalk ink.

Step 6

Use foam pads down one side of you stamped image to attach it to one side of your card.

Step 7

Trim a piece of patterned paper to fit inside your card, ink the edges and glue in place.

Step 8

Trim a plain piece of paper, doodle around the edges and glue in place. Now you have somewhere to write your message.

Step 9

Voila! A funky Bella Card.

(Pink Petticoat and Costco paper, Doodlebug paperfrill, Colorbox chalk ink, Bella Stamp)

Wednesday, August 22, 2007

An Altered Bucket

This is a really simple altered project that could be adapted to suit many purposes. My bucket came from IKEA but lots of craft shops sell buckets ready to alter. I made a peg bucket as the bag they were stored in had definitely seen better days but you could decorate it to suit many purposes and events - what about a birthday bucket filled with treats for the birthday girl, or use Halloween images for a trick or treat bucket.
I used two packets of rub-ons, an alphabet and a pack of flowers.

Cut around the rub-on that you want to use and sellotape it to the bucket in the correct position. I found this the easiest way to keep my rub-on in the right place as the bucket did tend to roll when it was on my table. Follow the instructions on the pack to apply the rub-ons to the bucket, most come with a little stick for rubbing over the top sheet but use a lolly stick if not. I used the letters to spell out the word 'peg' and then two flowers to grow up either side. Take your time to position your letters so that you get them centred. I sellotaped each letter individually to spell out the whole word before starting to rub them on.

Decorate your handles with ribbon scrap, I knot them twice to stop them becoming loose.

As always, we love to see how you've been inspired so please leave a link in the comments section. Love Andrea x

Tuesday, August 21, 2007

Join our campaign to get our children creating

Hi, it's Maria here again. Thank you to Di for the fab post on Fung Shui. I must admit that I am a real believer but am currently living in clutter central. It really does make a difference when you have space to move and breathe.
Anyhoo, back to todays post. Creativity is such an important part of our all of our lives here at It's a creative world. And, we all agree that it is important for our children to express themselves creatively.
It's so easy to get caught up with league tables tests and clubs that we can easily forget the simple things in life. A quiet afternoon spent painting or modelling with clay. A clean sheet of paper and a jar of coloured pencils ......... Ooh, the possibilities are endless.
Today I thought that I'd share the efforts of my girlie wirlies.
Charlotte is nine and drew herself in the garden on a sunny but windy day.

Amelia is seven and drew herself outside our house on a lovely sunny day.

We would love to see the masterpieces that your children create. All you have to do is email their masterpiece and a few words about them to acreativeworld@hotmail.co.uk before 31st August.

Every child will receive a certificate from us and ONE LUCKY WINNER WILL RECEIVE A £20.00 VOUCHER FOR THE EARLY LEARNING CENTRE.
£20.00 to spend on whatever takes their fancy. All the names will be put in a hat and the winner will be announced here on Sunday 2nd September. Obviously, my girlies won't be in the draw they just wanted to join in.
We look forward to seeing your child's masterpiece soon.
Toodle pip

Monday, August 20, 2007

A little Feng Shui in our lives...

Hi from Di the mad, eccentric darling mother of Caz. So enjoying my stay in England and sad to be leaving tomorrow.
Feng shui, pronounced in English as ("fung shway"), was known as "Kan-Yu" which means 'The Law of Heaven and Earth.’ Today's Feng Shui schools teach that it is the ancient Chinese practice of placement and arrangement of space to achieve harmony with the environment.
So how is your harmony??? I have been trying to apply the principles of feng shui in my life for a few years and it has made a big difference to my outlook, how I live, and my life. What feng shui means to me practically (apart from the above) is removing the clutter from my space and organizing what’s left. Getting organized is a way of life that doesn’t just affect our crafty stuff. So let’s start with the kitchen. Caz uses these great containers for dry goods. Firstly they are made of glass so are easy to clean, do not scratch, are see through, and look good. Secondly they have a great seal so the contents stay dry and ‘fresh’. Thirdly you can see when they need toppng up. You can buy them from ASDA and most kitchen shops.

And how about these wonderfully shaped coffee jars also made of glass - and they are free.

Then to the crafty room. You may remember that I just put all of my ribbon and buttons into a BIG plastic container:

Well, this is the way Caz stores hers:

These jars are available from Ikea.

Ok and she also uses glass for buttons :

But she has recycled jars - her old spice jars! When I retired in January I planned to sell my home and so went on a major mission to clear the clutter. I planned a garage sale which was great and raised a lot of cash!!! What was left I donated to charity and they too raised quite a bit! OK I did go a bit far! This was my spare room... and this is it now.... But I did mostly get rid of stuff that I did not use, or did not know I even had! My home, and cupboards are now filled with beautiful SPACE. So a challenge, get organised and clear the clutter. Don't try to do it all in one day. Take just one cupboard at a time. You will be surprised and what you find, throw out and how GREAT you feel when it's done...You will create lots of space and energise your home. Caz has risen to the challenge and the "magpie" has started to clear the clutter!!! A quote from her blog "Today I have been clearing out. I have too much clutter in my house and I feel like I am drowning in it. I started with my books. Next stop is the coat cupboard! Isn't it amazing how much we collect over the years, little things that we can't possibly throw out :) Well my challenge is to find the strength to get rid of things that just take up space and serve no purpose!" "Well yesterday I managed to clear loads and start my big declutter, it felt so good to finally get some order back into the house. I still have some way to go but at least I have made a start :)" Oh don't forget the children's art competition. We are so excited to see their work! Finally, remember the easy peasy mini album we showed a few weeks back, well Charlotte (post from August 2nd 2007) created this album (Christmas memories) and agreed that we can share it with you... Thanks Charlotte for sharing this with us, we do love to see what you create!!! Thanks again for visiting love from Di XXX

Sunday, August 19, 2007

More Quick Cards

How many cards do you buy from shops in a year? If you think about it you'll probably run out of fingers and toes several times over! Birthdays, Anniversarys, Get Well Soon, New House, New Baby, Wedding, Hello, Goodbye, New Job, Christmas etc. etc. etc.
Wouldn't it be great if you had a box of cards that you could dip into whenever the need arises? To be able to send a hand crafted card that looks like it's taken hours of hard work when in reality it took just a few minutes.
So what about this quick and easy card then? A general use card suitable for a new baby, Happy Birthday or just to say hello that is quick enough for you to be able to make a few at a time to begin your collection for your box of cards
Step 1
Cut striped paper to size, ink around the edges with a charcoal chalk ink pad and adhere to card blank.

Step 2

Glue a toning length of ribbon across card and trim edges with sharp scissors to prevent fraying (I keep my ribbon and fabric scissors seperate to my paper scissors so keep them sharp).

Step 3

Stamp an image with a permanent ink pad and colour with watercolour paints of pencils, trim to size and ink around the edges with black chalk ink. Attach to your card with foam pads to raise the image from the background and give extra definition.

Step 4

Select co-ordinating buttons and attach with strong glue down the side of the card or you could add a sentiment instead of buttons

(Striped paper from Shabby Princess, Ribbon from Amercan Crafts, Buttons by FooFaLa, Stamp by Tilda at Panduro)

Have fun making cards, we would love to see your handywork so please leave a link in the comments box.
Andrea x